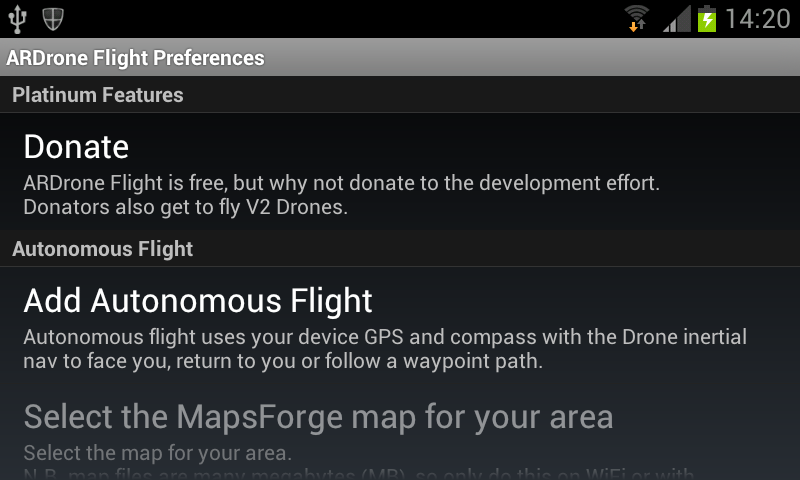
If you like and use this Android version of the AR.Drone app, please donate to keep development going, using this button:
Application Permissions and Privacy
This application does not keep or send to any servers in the control of the application developer any data which can identify the user.
Google requires any application that uses the READ_PHONE_STATE permission should explain its use and for this application it is not being used, but the Play Store upload check seems to think it is.
ARDrone Flight Configuration Video
There is now a configuration video which takes you through the inital setup and main features of the App.
Download ARDrone Flight
Available on Google Play Store for free, although V2 owners have to donate via the Platinum features menu:
Also available on Amazon Appstore for Kindle Fire and other Android users:
ARDrone Flight Pro Configuration Video
There is also a Pro configuration video which takes you through the inital setup and main features of the Pro edition.
ARDrone Flight Pro What's New Video
There is also a Pro What's New video which shows the new features of the Pro edition.
ARDrone Flight Pro Flight Recorder Video
There is also a Pro Flight Recorder video which shows the use of the new Parrot Flight Recorder add-on for V2 drones in the Pro edition.
ARDrone Flight Pro, the paid version with all the Platinum Features and V2 Drone support for professional drone pilots, on Google Play Store:
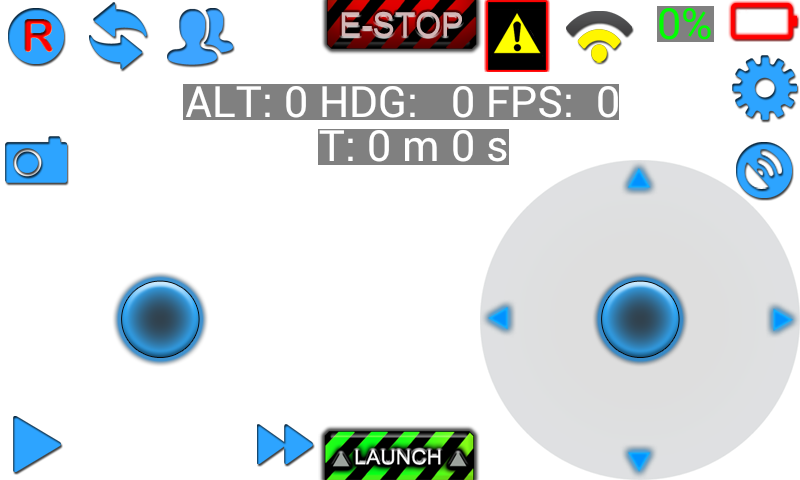
Once the app is up and running you should see the following screen (video not shown, so if it looks exactly like this, you have a problem with video):
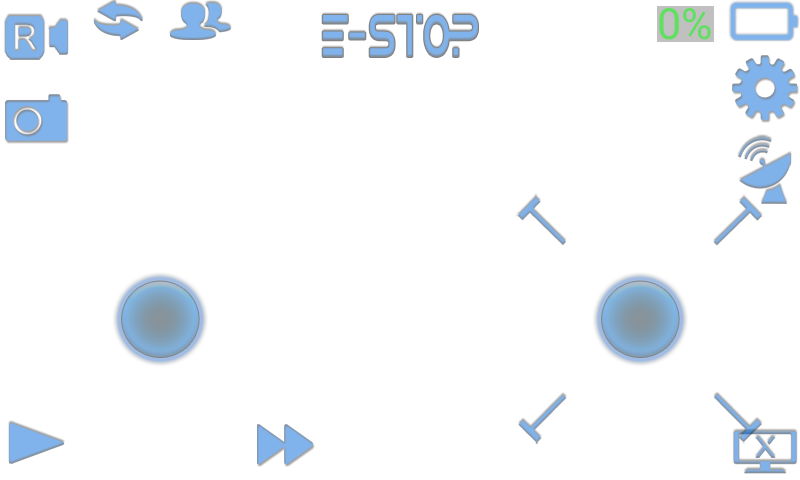
Main Flight screen showing on screen controls
Main Pro screen showing on screen controls
To control the Drone press and hold on the screen button and tilt to move.
Video Recording
The record button is top left. It has a red 'R' when not recording. If recording is under way, the centre turns transparent. Video is recorded to the /sdcard/ARDroneFlight/video.
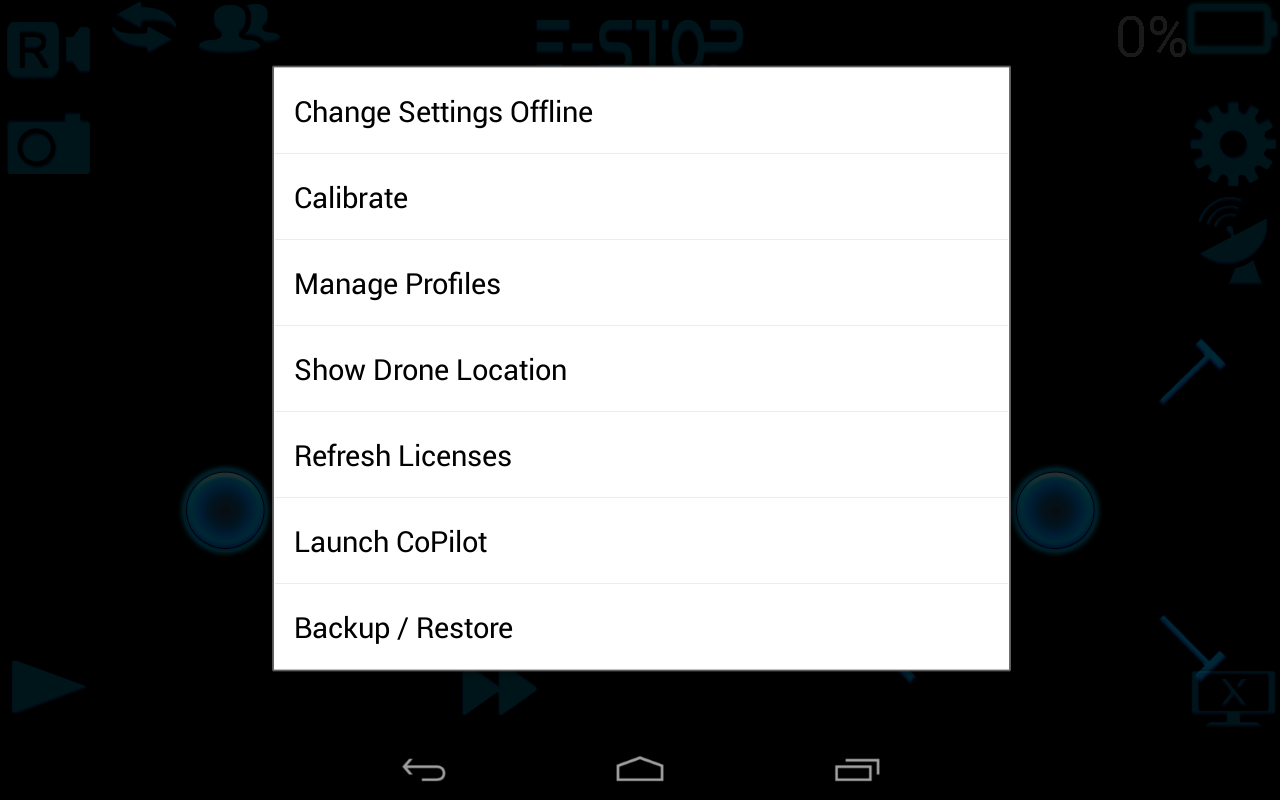
Settings Menu
Pressing the menu button on your phone shows the on-screen menu buttons:
Change Settings (Offline)
Displays the settings screen, allowing configuration changes. Offline is shown when not connected to a drone.
Calibrate
Press this menu item to recalibrate the Drone when it is placed on a horizontal surface. For V2 Drones, if you press this when flying, it will calibrate the magnetometer by spinning around.
Press this menu item to toggle the Autonomous mode map on and off.
Refresh Licenses
Press this menu item to connect to the internet and refresh your licenses for purchases.
Launch CoPilot
Press this menu item to launch a CoPilot connection.
Backup / Restore
Press this menu item to backup/restore your current ARDrone Pro settings to/from SD card.
Download USB videos
Press this menu item to download videos recorded to the drone USB key. Downloads take place in the background unless you select the 'Show USB transfer activity' option in 'Select visible buttons and UI'.
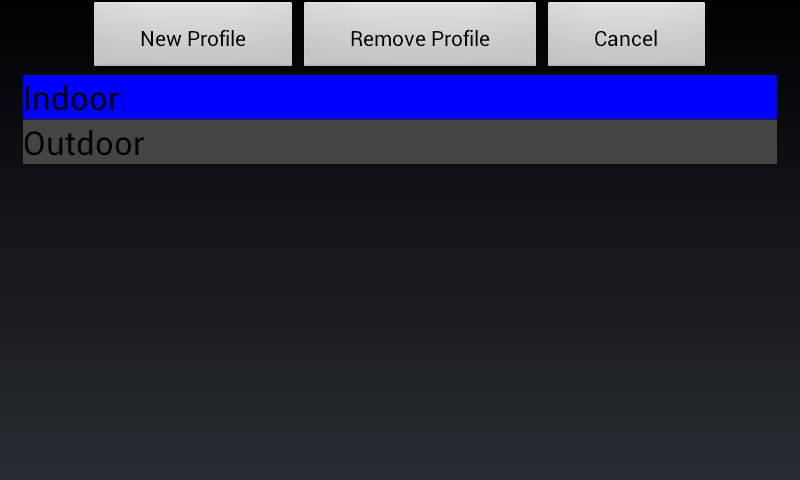
Manage Profiles Dialog
The Manage Profiles dialog shows a list of the preference profiles you have created, allowing you to create or remove profiles.
Profiles allow you to create a set of preferences and then switch between them quickly.
For example, you can create an indoor profile for flying indoors, using the indoor hull; an outdoor profile with the outdoor hull and more agressive angle limits; or a beginner or expert profile.
It is up to you how you want to use a group of preference settings.
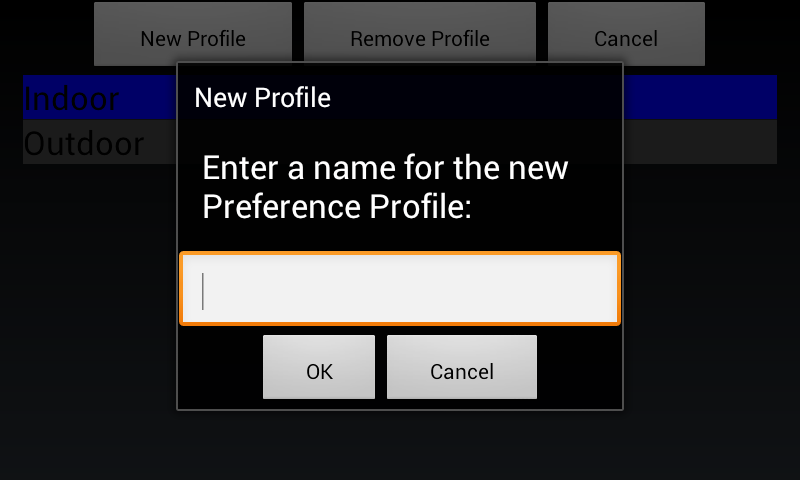
New Profile Dialog
Pressing 'New Profile' displays the New Profile dialog to enter the name of your new preference profile.
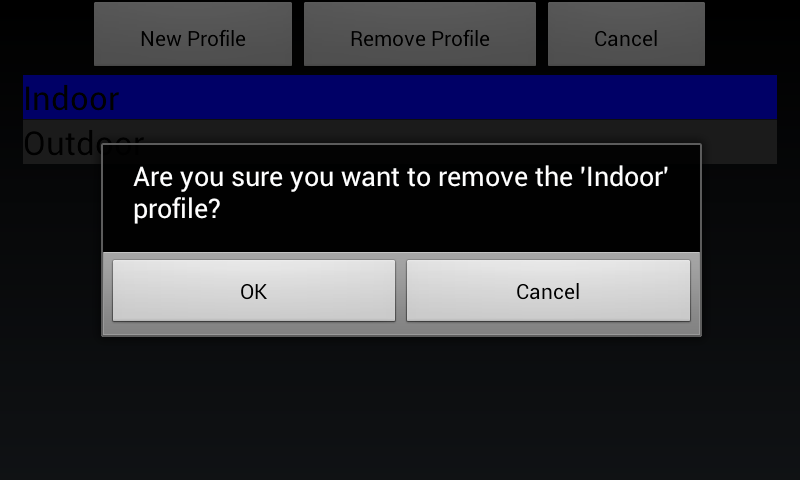
Remove Profile Dialog
Pressing 'Remove Profile' will confirm you want to remove the current highlighted preference profile.
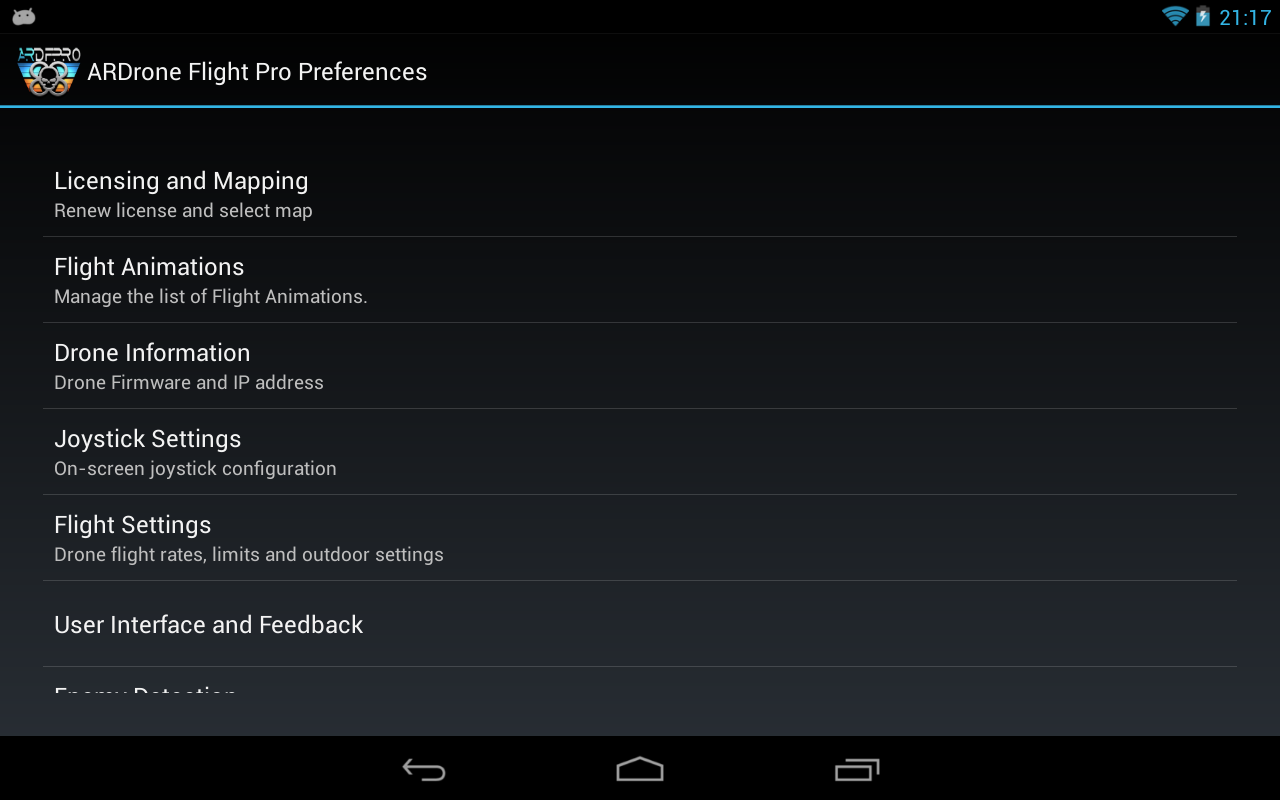
Flight Preferences
The main preferences allows you to configure your AR.Drone via various sub menus.
Licensing and Mapping allows you to refresh your Pro license and to download a map for Autonomous Flight.
Licensing and Mapping:
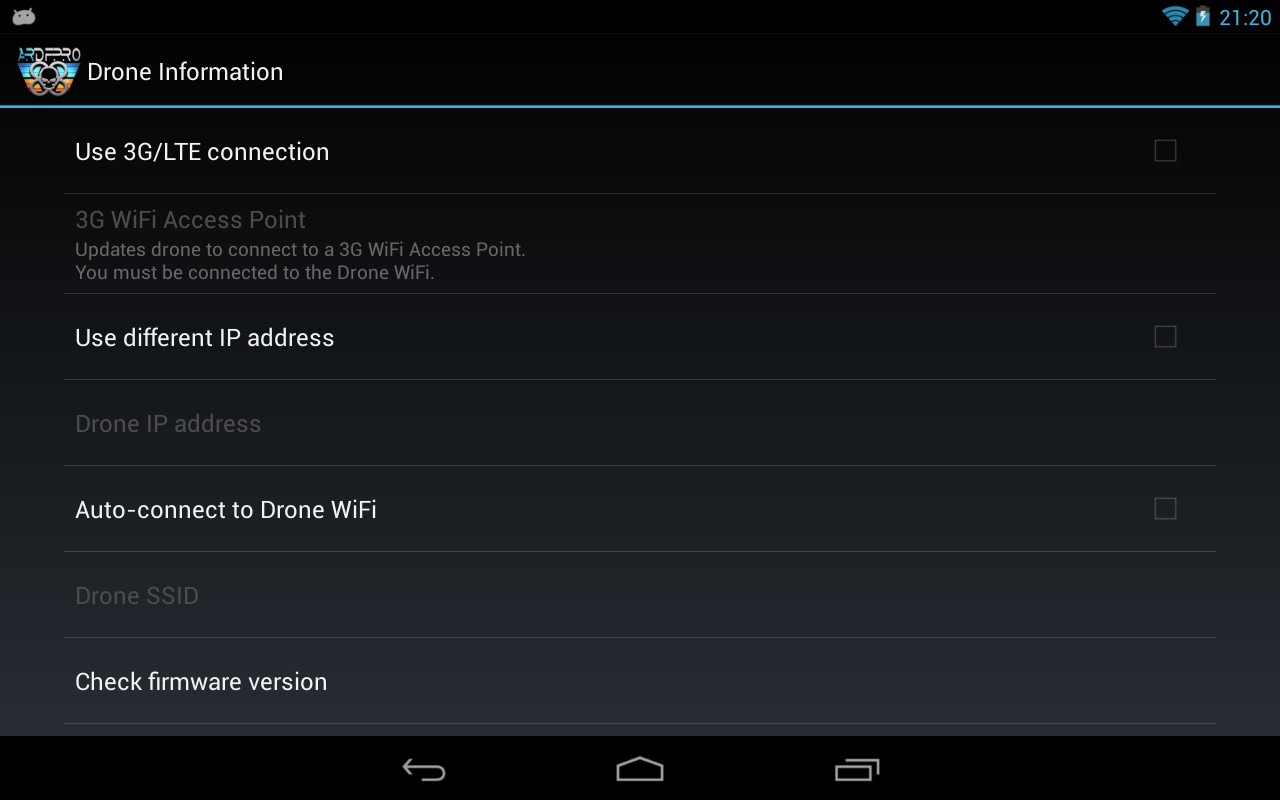
Drone Information
Drone Information allows you to update you firmware, auto-connect to the Drone (Pro only) or configure a different Drone IP address.
Drone Information:
Use 3G/LTE connection
When checked, tells the ARDrone Flight app to turn of wifi ui as a 3G connection is being used to the drone. The drone will connect to the 3G WiFi access point and you connect to the 3G access point IP over 3G.
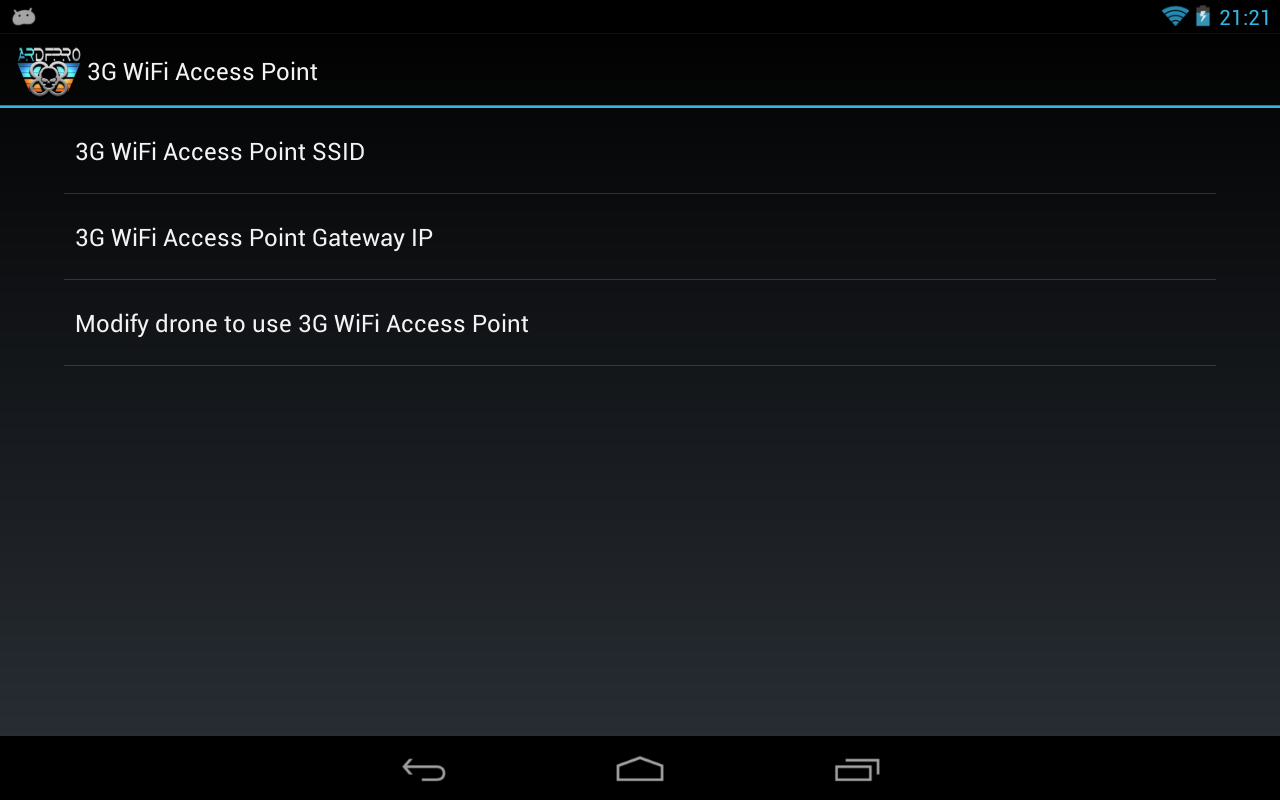
3G WiFi Access Point
When 'Use 3G/LTE connection' is checked, press this to enter the 3G WiFi access point information.
3G WiFi Access Point SSID
This is the SSID of the 3G WiFi access point that the Drone will connect to.
3G WiFi Access Point IP
This is the IP of the 3G WiFi access point gateway that the Drone will connect to.
Modify drone to use 3G WiFi Access Point
When pressed it will temporarily update the drone to connect to the 3G WiFi access point. You have to be connected to the drone wifi for this to work. Simply cycle the drone power to return the drone to normal operation.
Drone Information continued:
Use different IP address
When checked, tells the ARDrone Flight app to use the IP address in the 'Drone IP address' preference to talk to the Drone. The default IP address is 192.168.1.1.
Drone IP address
When 'Use different IP address' is checked, press this to enter the IP address of the Drone. The default IP address is 192.168.1.1.
Auto-connect to Drone WiFi (Pro only)
When checked, a dialog will appear to allow you to choose your Drone WIFI SSID.
This SSID will be connected to automatically at app start-up or when switching back from the Licensing and Mapping or Firmware downloads.
Drone SSID (Pro Only)
When 'Auto-connect to Drone WiFi' is checked, press this to modify the WiFi SSID of the Drone. The SSID should be surrounded by quotes (").
Check firmware version
Press this preference entry to go the Firmware Update screen.
Pair this device with the drone
When selected the current device will be paired with the drone so other MAC addresses will no longer be able to connect to the drone WiFi.
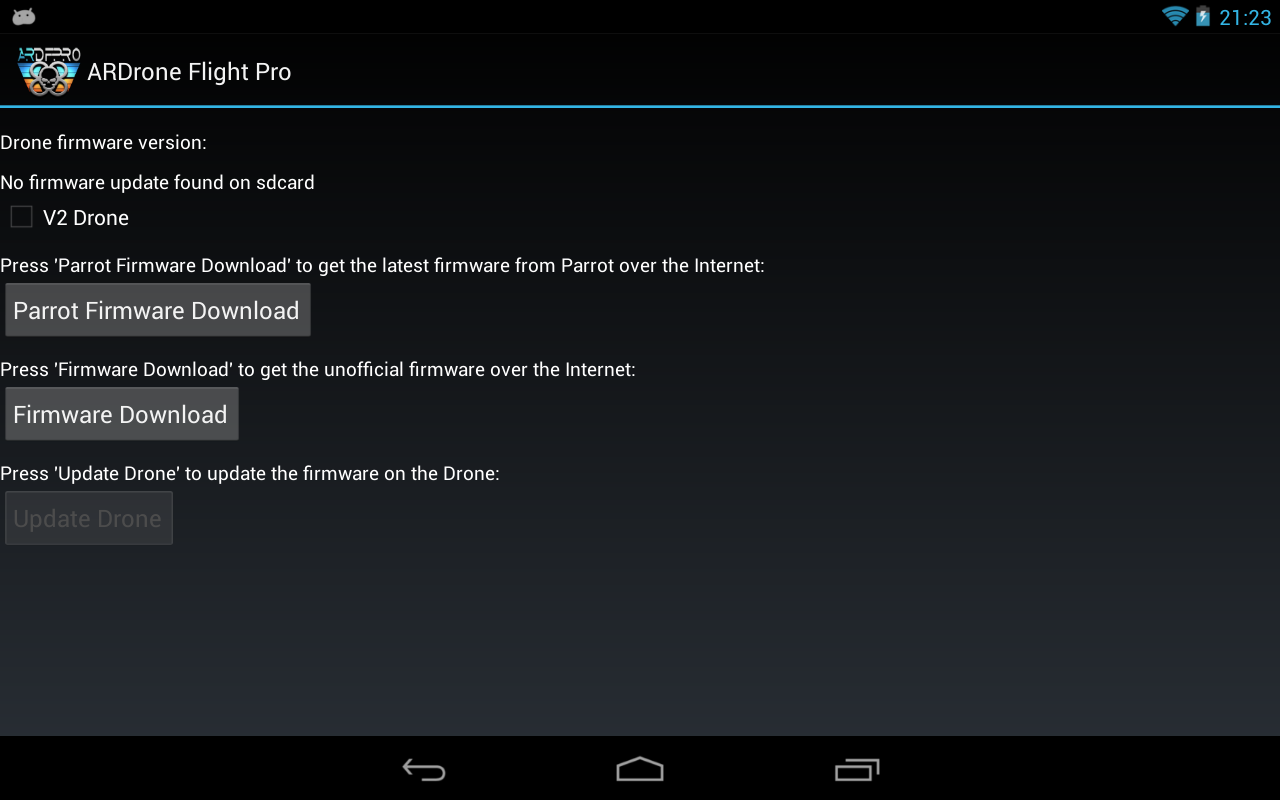
ARDrone Flight - Firmware Update
This shows the current firmware installed on the Drone and downloaded to /sdcard/ARDroneFlight/firmware/ardrone_update.plf.
Use the V2 Drone check box when offline only. It allows you to choose the drone version you are downloading the firmware for.
Parrot Firmware Download
Press this button to download the latest Drone firmware from the Parrot website. It is a 6MB file, so if you are using the MobileAP on your phone, then it will download over your data connection. If you don't have a different IP address configured for you Drone, it assumes you are using ahdoc wifi, so shows the wifi settings screen to allow you to switch to the internet and back to the Drone wifi.
It downloads to /sdcard/ARDroneFlight/firmware
Firmware Download
Press this button to download the latest unofficial Drone firmware. It is a 6MB file, so if you are using the MobileAP on your phone, then it will download over your data connection. If you don't have a different IP address configured for you Drone, it assumes you are using ahdoc wifi, so shows the wifi settings screen to allow you to switch to the internet and back to the Drone wifi.
It downloads to /sdcard/ARDroneFlight/firmware
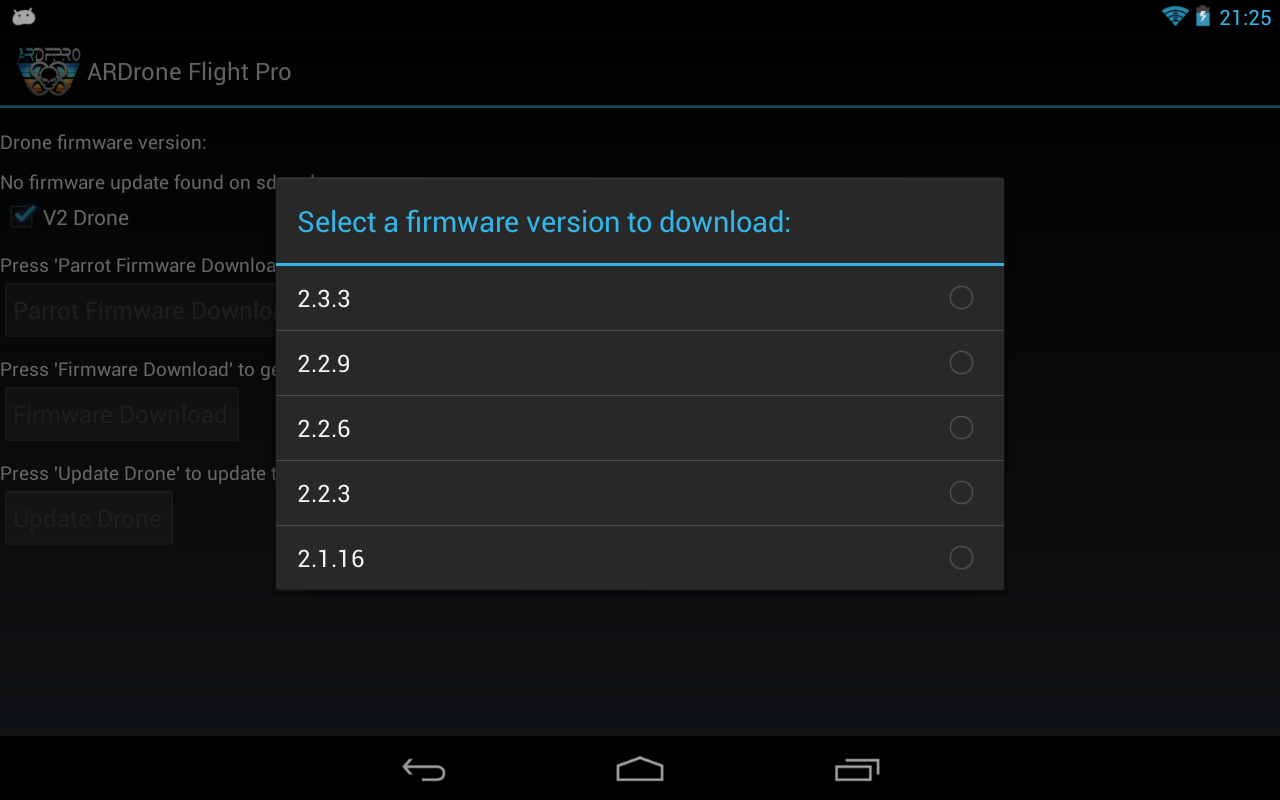
ARDrone Flight - Firmware List:
Update Drone
Press this button to update the Drone firmware from the /sdcard/ARDroneFlight/firmware/ardrone_update.plf. The button is only enabled if the file is present on the SD card.
You can copy this onto your SD card before starting the ARDrone Flight app. This allows you to install different versions of the firmware than the one currently available from the Parrot website.
Firmware downgrades are also supported.
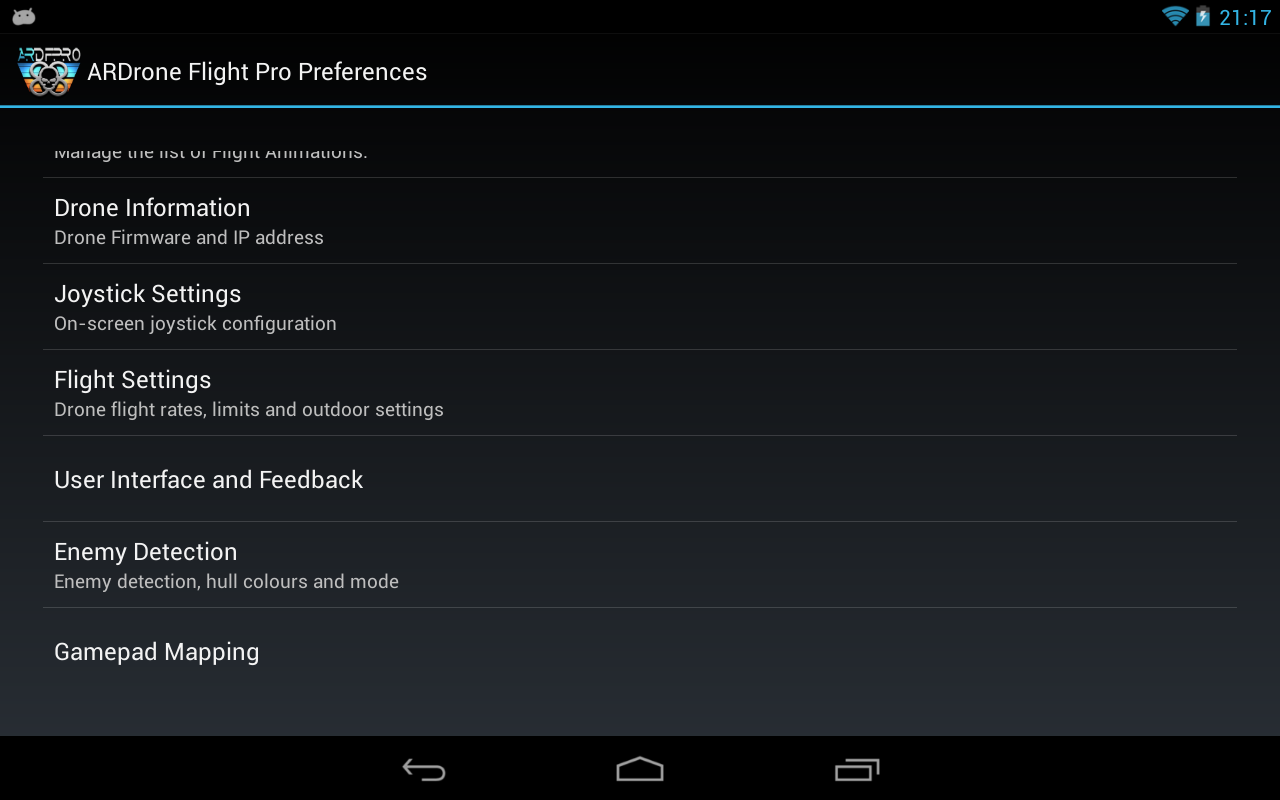
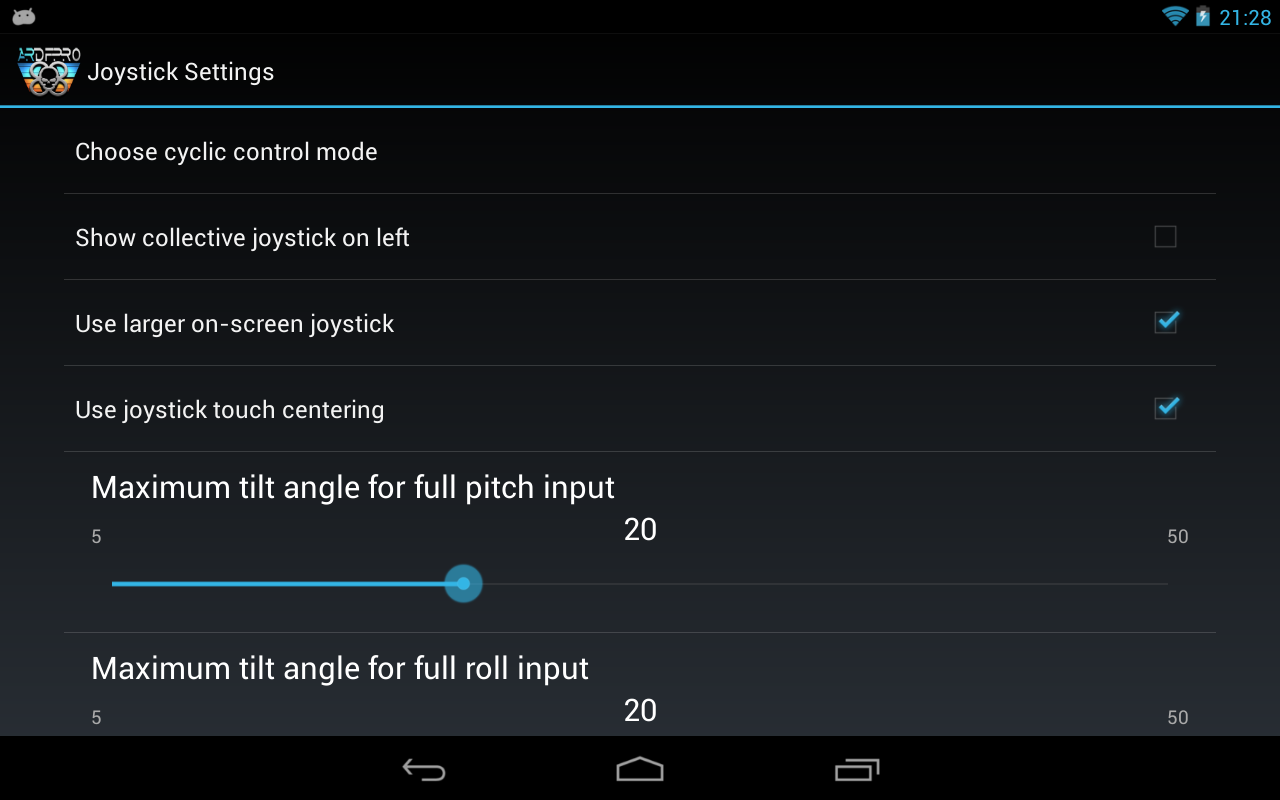
Joystick Settings
Joystick Settings allow you to choose the settings for the cyclic and collective joystick.
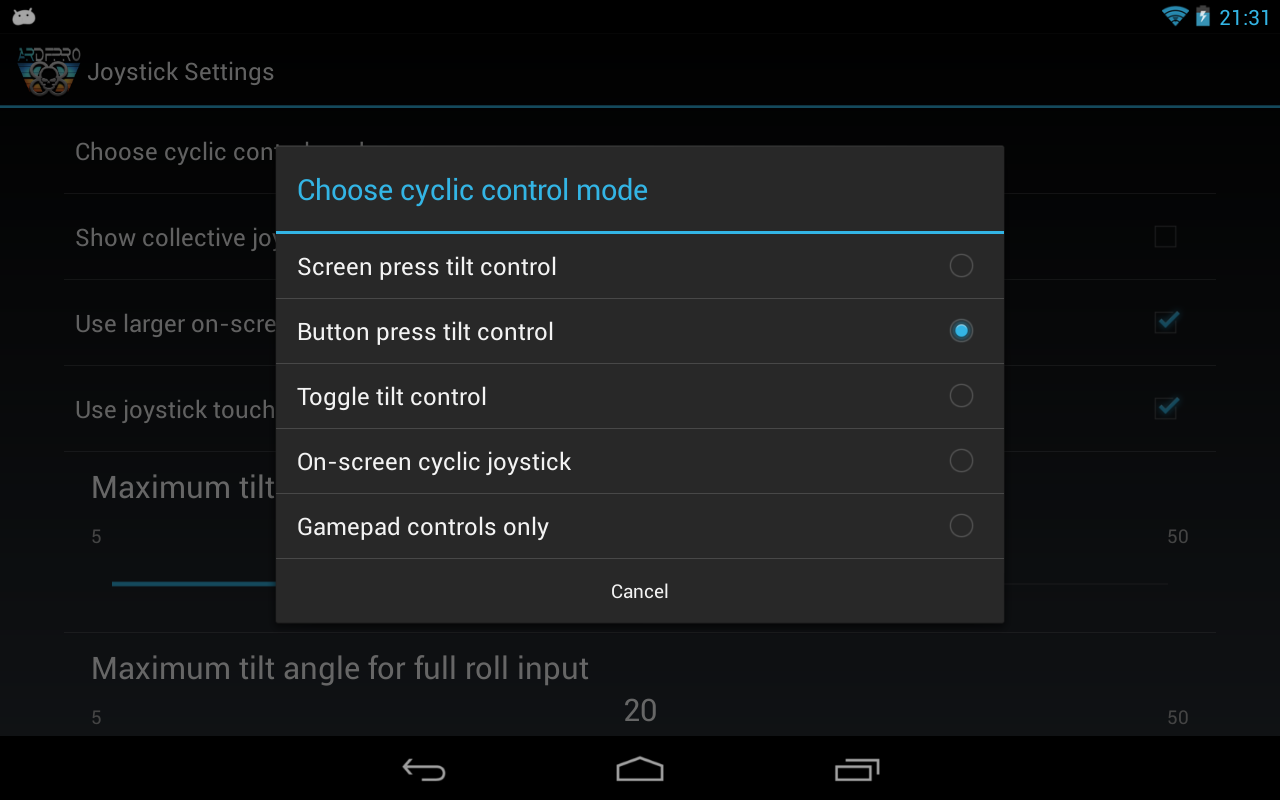
Choose cyclic control mode
Pressing this shows a list box with the various ways of controlling the Drone pitch and roll (cyclic control).
Screen press tilt control
In this mode, you use the tilt of your phone to control pitch and roll by touching and holding anywhere on the screen.
You can also control the drone by holding on the collective joystick, then tilt controls pitch and roll and the collective joystick controls height and yaw.
Button press tilt control
In this mode, a small button is shown where the cyclic joystic would be displayed. Pressing and holding this is the only way of activating the tilt control for pitch and roll.
Toggle tilt control
In this mode, a small button is shown where the cyclic joystic would be displayed. Pressing this toggles between tilt control mode and hovering. In tilt control mode you no longer have to keep touching the screen while tilting your phone to control pitch and roll. Toggling out of tilt mode is the only way to get the Drone to go into a hands-off hover.
If you have Text to Speech enabled, a voice prompt is given stating when tilt control is active or disabled.
On-screen cyclic joystick
In this mode, an on-screen cyclic joystick is shown which can be used to control pitch and roll like a helicopter cyclic joystick. The cyclic joystick controls the drone pitch (via up/down) and roll (via left/right).
The tilt control of the drone is disabled.
Gamepad controls only
In this mode, neither the on-screen cyclic or collective joysticks are shown. Use this mode only if you are controlling the drone from a USB/BlueTooth gamepad.
Joystick Settings continued:
Show collective joystick on left
When checked, shows the on-screen collective joystick on the left rather than the right. The collective joystick controls the drone height (via up/down) and yaw (via left/right).
If the Use cyclic joystick is also checked, then the cyclic joystcick will be shown on the right rather than the left.
Use larger on-screen joystick
When checked, the on-screen joystick will be larger. This is useful on devices with larger screens.
Use joystick touch centering
When checked, the on-screen joystick can be touched anywhere and this is taken to be the centre of the joystick. You can run out of range in this mode, if you hit the edge of the screen, so lift off and try touching closer to the joystick centre.
Joystick settings continued:
Maximum tilt angle for full pitch input
Adjusts the angle you have to tilt for full pitch input.
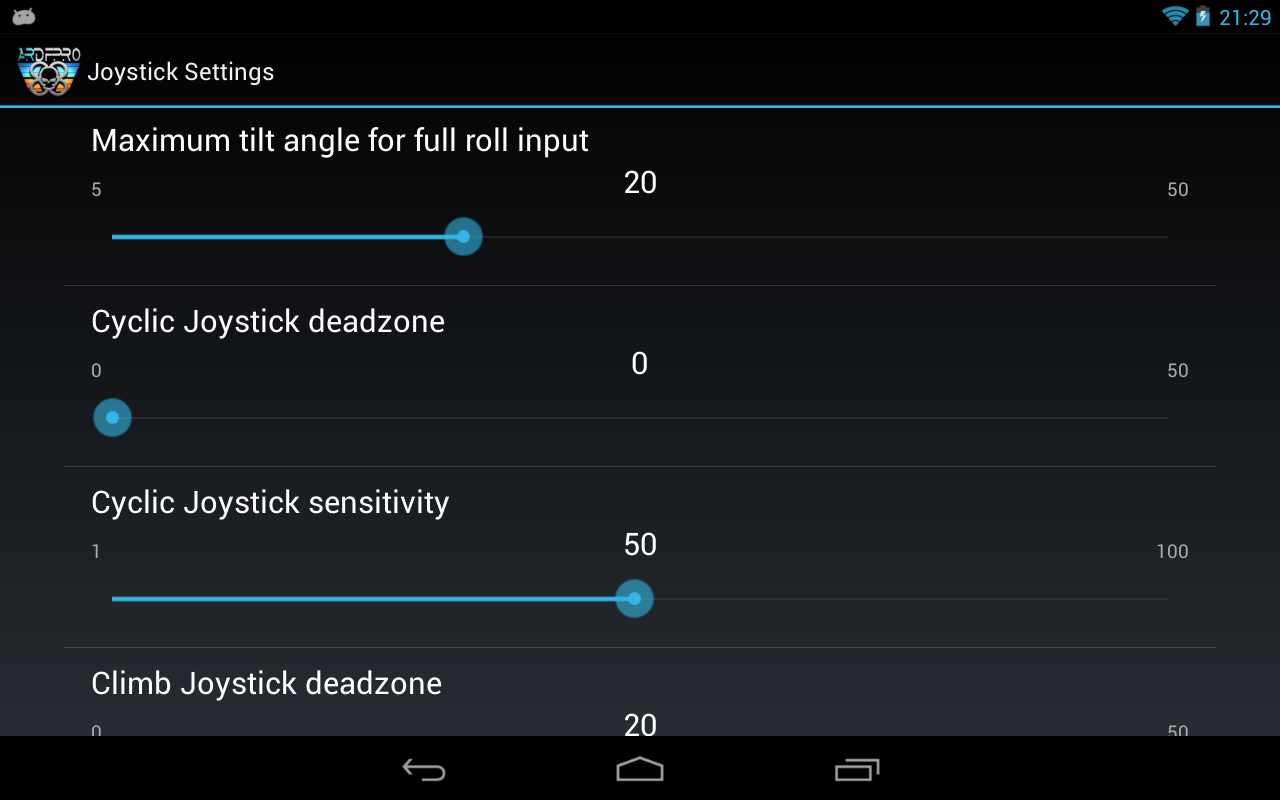
Maximum tilt angle for full roll input
Adjusts the angle you have to tilt for full roll input.
Cyclic Joystick deadzone
Adjusts the amount you have to move the cyclic joystick before the drone starts pitching or rolling.
Cyclic Joystick sensitivity
Adjusts the how quickly the drone responds to the cyclic joystick movements.
Joystick settings continued:
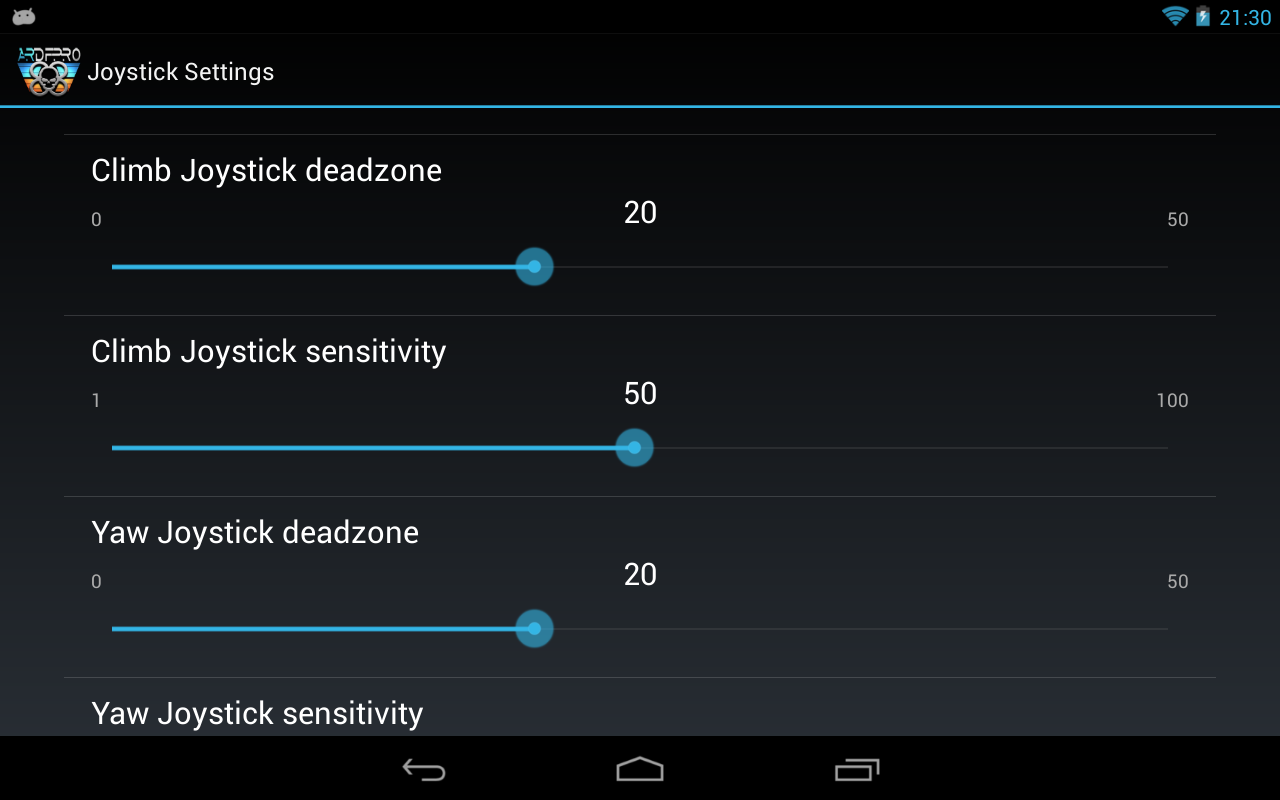
Climb Joystick deadzone
Adjusts the amount you have to move the climb joystick axis before the drone starts changing altitude.
Climb Joystick sensitivity
Adjusts the how quickly the drone responds to the climb joystick axis movements.
Yaw Joystick deadzone
Adjusts the amount you have to move the yaw joystick axis before the drone starts rotating.
Yaw Joystick sensitivity
Adjusts the how quickly the drone responds to the yaw joystick axis movements.
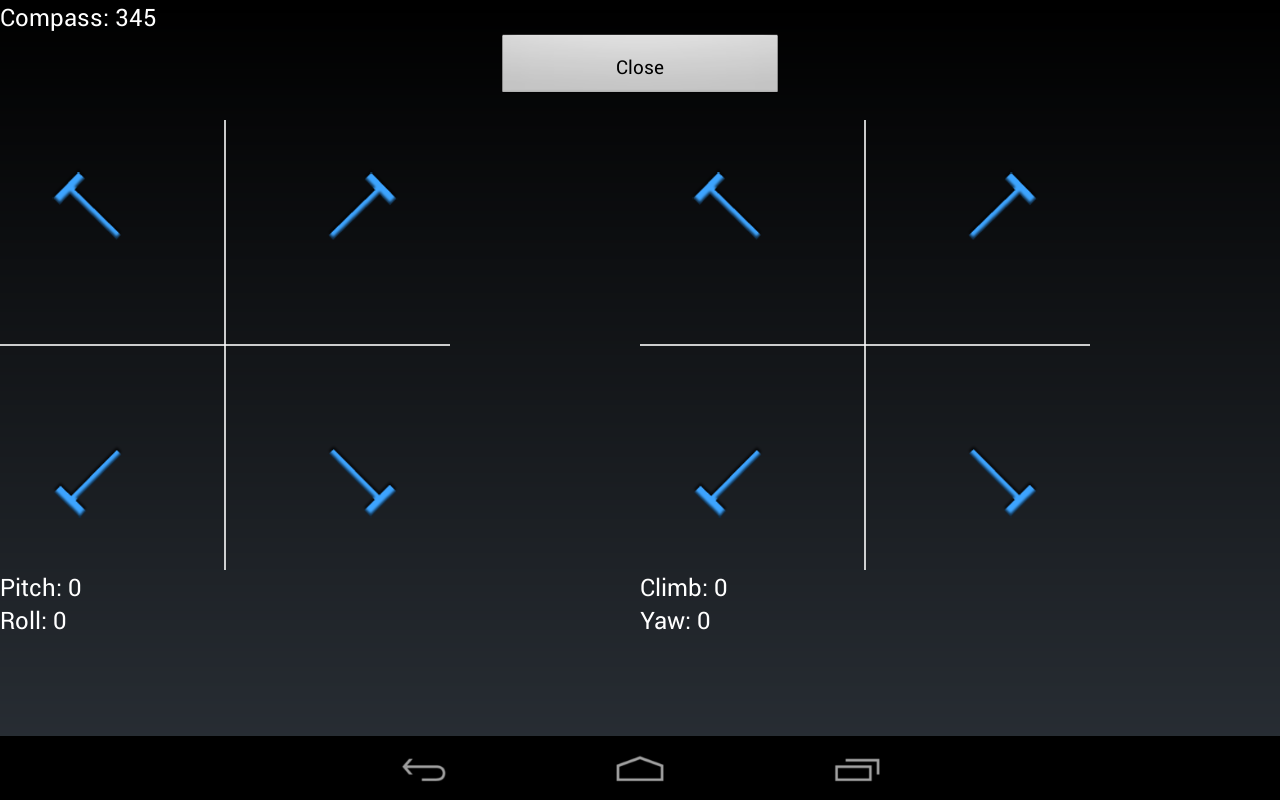
Joystick Motion
Joystick Motion shows the current gamepad motion for cyclic and collective, or cyclic tilt when pressing on the screen.
Use this to show quickly adjust deadzones and sensitivities.
Flight Settings
Flight Settings allow you to choose the settings in the Drone which changes its flight characteristics.
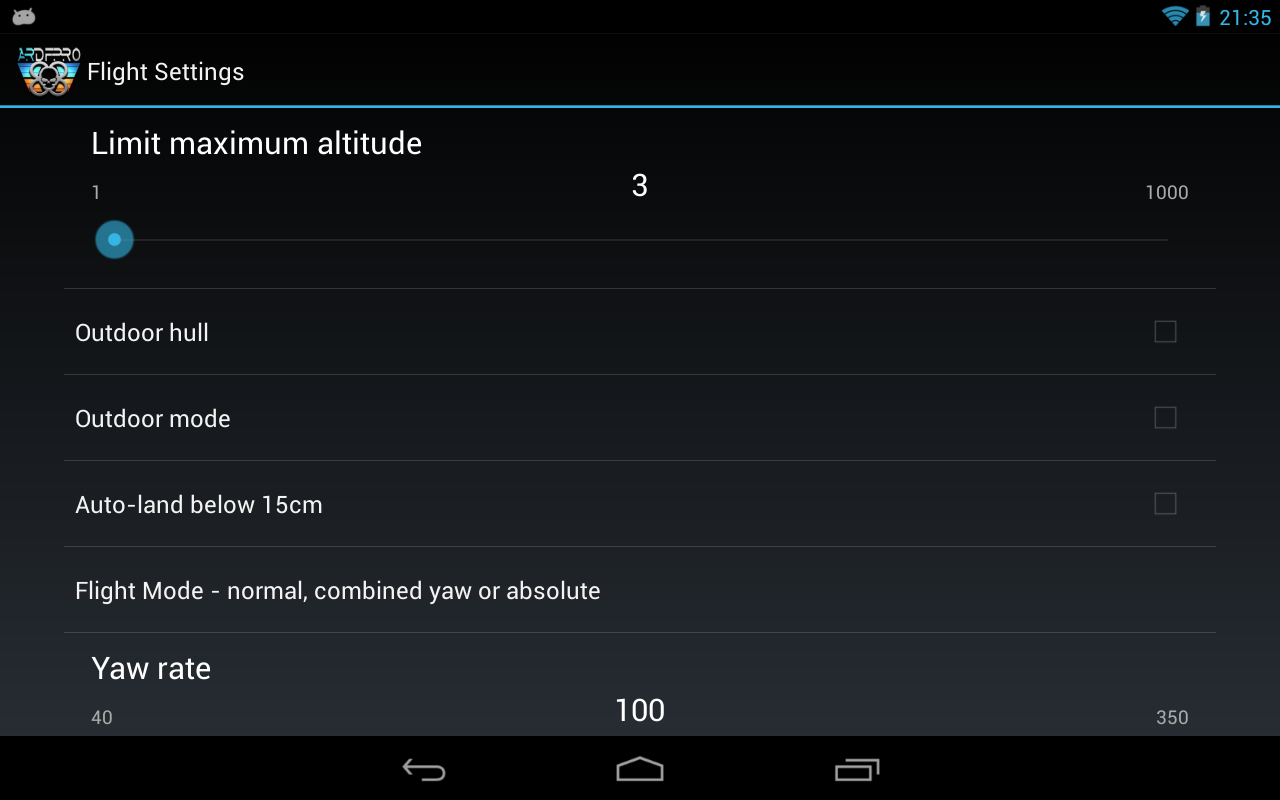
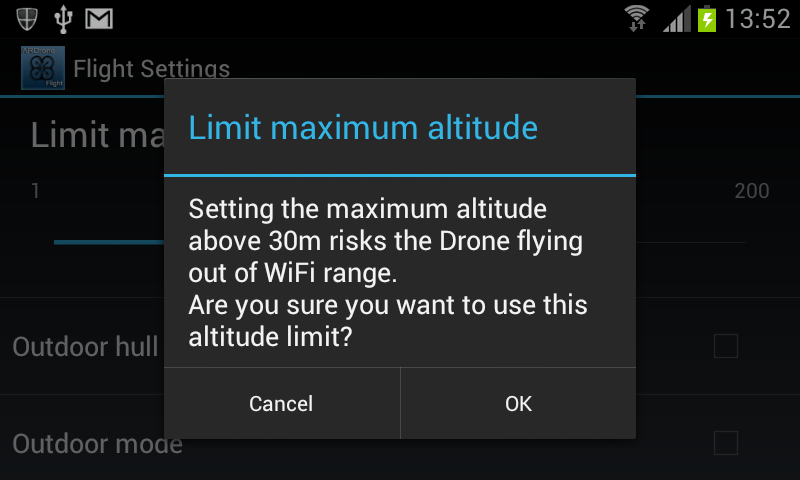
Limit maximum altitude
This slider limits the maximum height of the AR.Drone in meters. It defaults to 3m.
You should only use up to 10m for a V1 Drone. If you try to go above 30m you get a wifi range warning.
Outdoor hull
When checked, tells the AR.Drone that it is flying with the outdoor hull.
Outdoor mode
When checked, tells the AR.Drone that it is flying outside and should allow for wind.
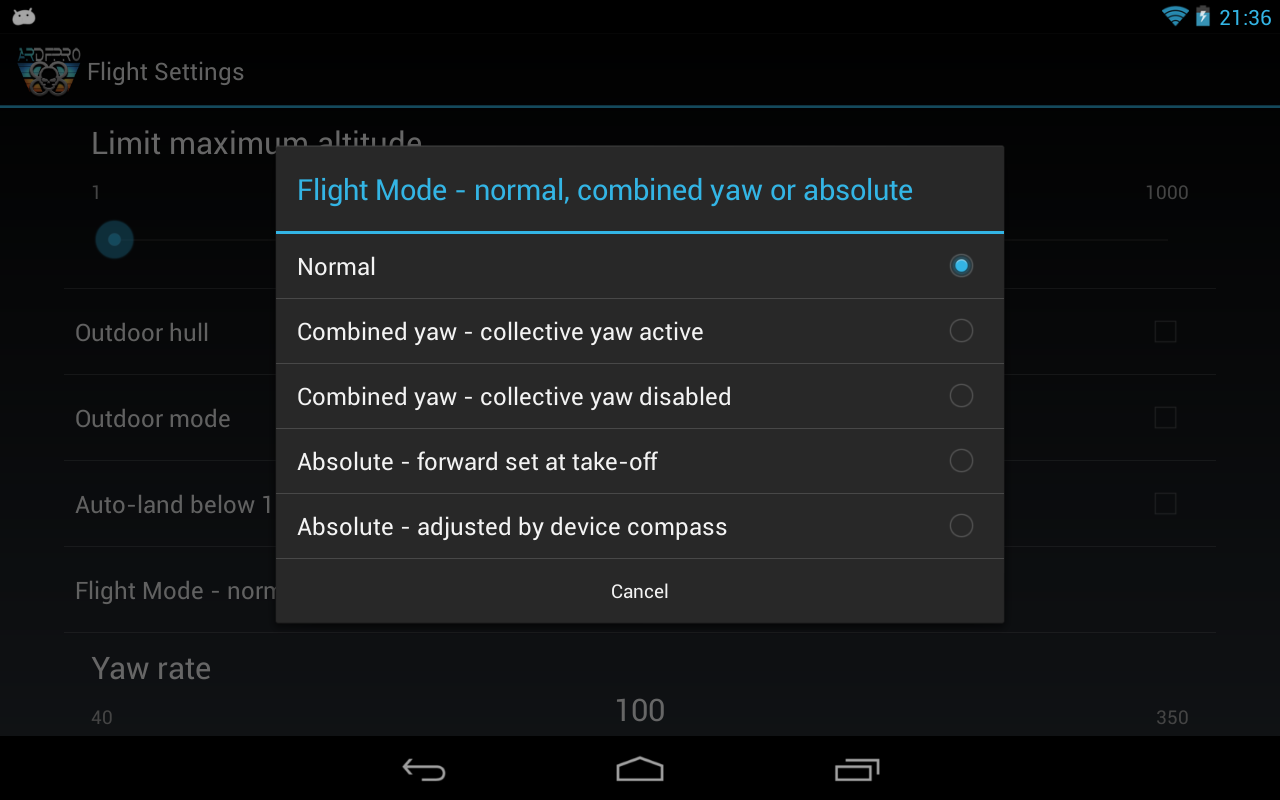
Flight mode - normal, combined yaw or absolute
Pressing this shows a list box with the various ways of controlling the combined yaw flight mode (simple flight mode).
Normal
In this mode, moving foward (via tilt or cyclic) flies the Drone in the direction the front camera is facing. This is like first person mode, so you fly as if you are sitting in the Drone.
Combined yaw - collective yaw active
In this mode, tilting the drone left and right will also cause it to yaw to the left and right. The collective joystick can also be used to yaw the Drone.
Combined yaw - collective yaw disabled
In this mode, tilting the drone left and right will also cause it to yaw to the left and right. The collective joystick only controls the Drone height and has no effect on yaw.
Absolute - forward set at take-off
In this mode, moving forward flies the drone in the direction you were facing at take off. This is like third person mode, so forward/back/left/right are all relative to the direction you were facing when the Drone took off, with forward flying away from you.
Absolute - adjusted by device compass
In this mode, moving forward flies the drone in the direction you are facing, and it uses your device compass to know if you turn round after taking off. This is like third person mode, so forward/back/left/right are all relative to the direction you are currently facing, with forward flying away from you.
Flight Settings continued:
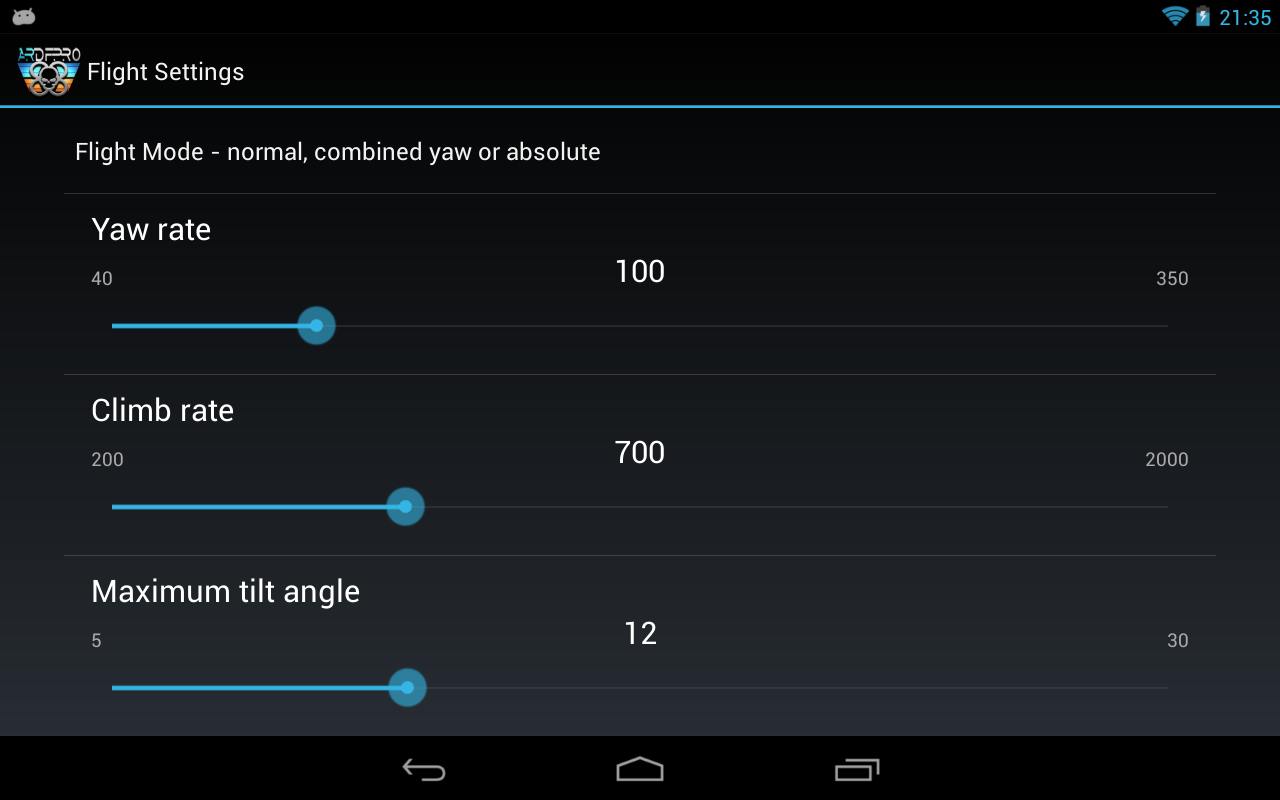
Yaw rate
Adjusts the speed at which the AR.Drone responds to control changes in pitch and yaw in degrees/s.
Climb rate
Adjusts the rate at which the AR.Drone changes altitude in mm/s.
Maximum tilt
Adjusts the maximum angle to which the AR.Drone will tilt. This affects the maximum manouvering speed.
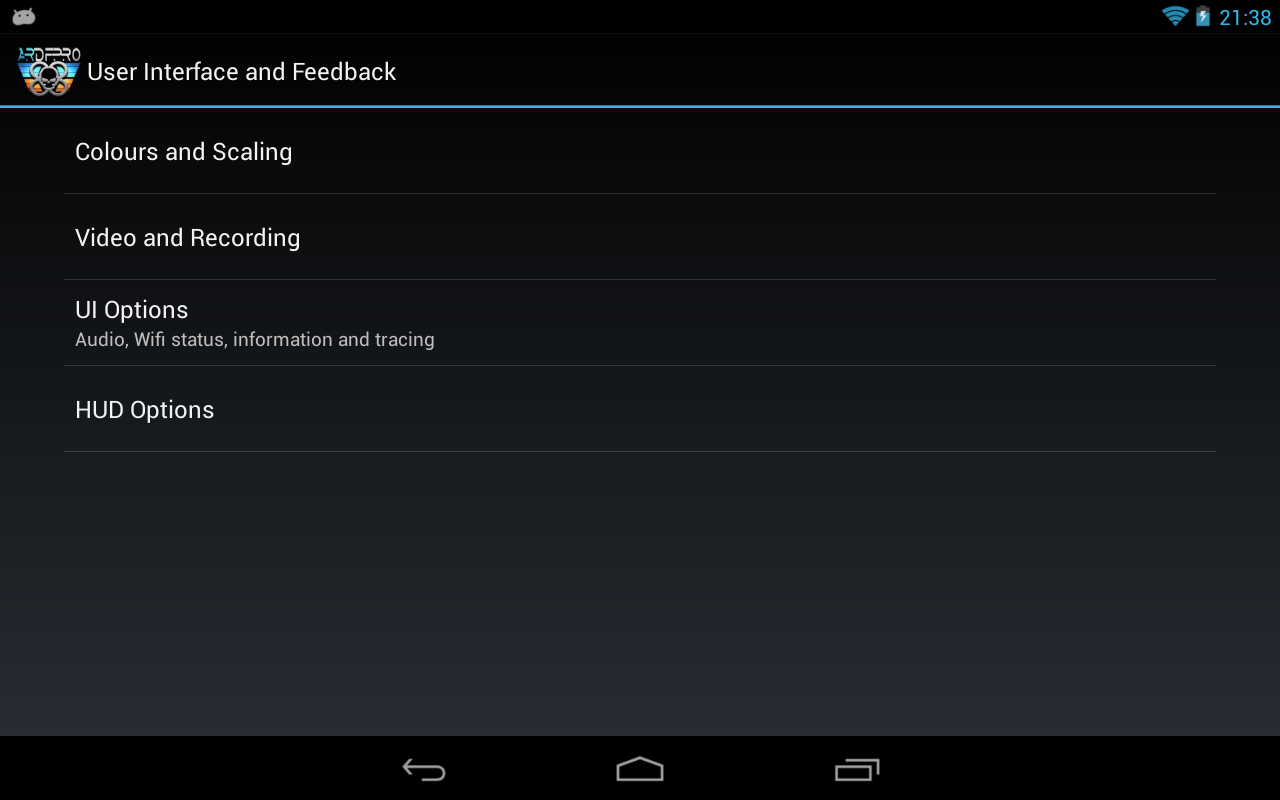
User Interface and Feedback
User Interface and Feedback allows you to choose the UI settings which are shown on-screen or via audio or vibration feedback.
Colours and Scaling
The various colours and scaling options.
Video and Recording
The video and recording options.
UI Options
The main UI options.
HUD Options
The HUD options.
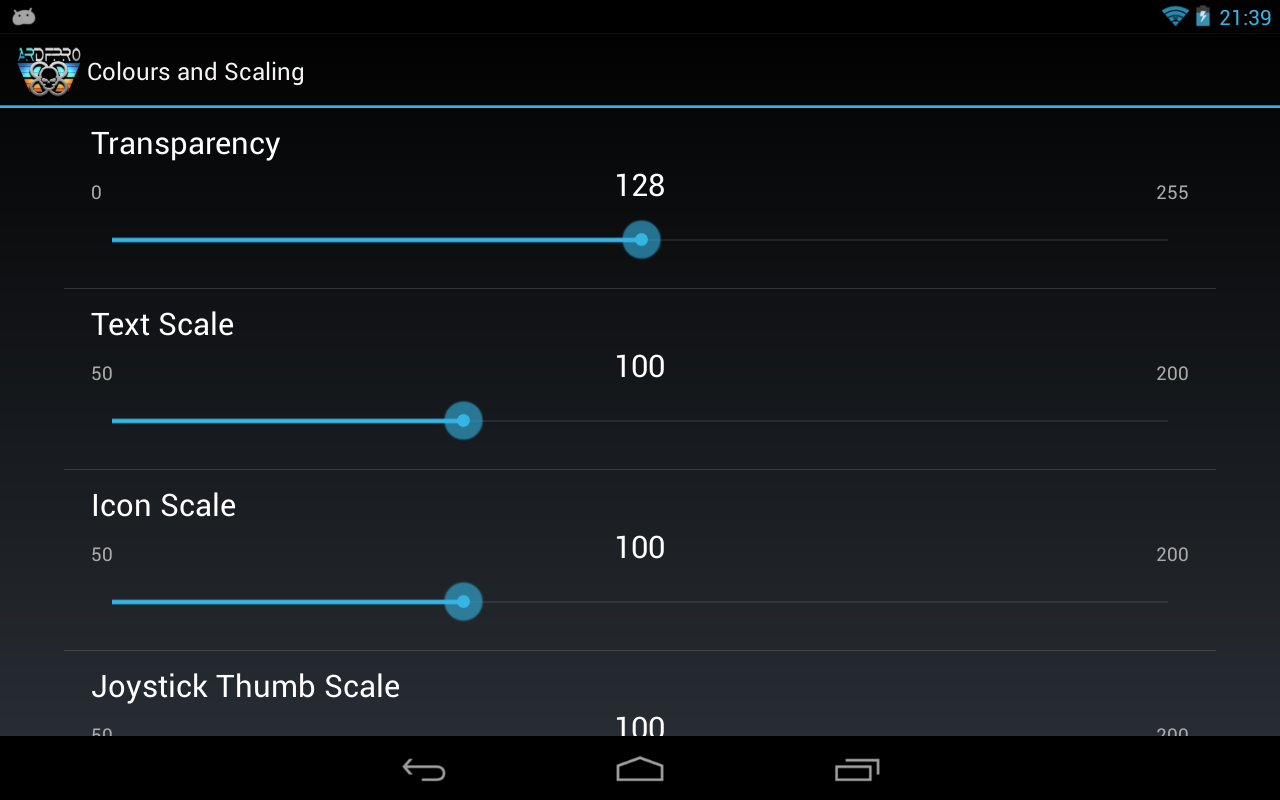
Colours and Scaling
Transparency
Controls how opaque the controls are over the video.
Text Scale
Controls the size of the on-screen text.
User Interface and Feedback continued:
Icon Scale
Controls the size of the on-screen icons.
Colours and Scaling continued
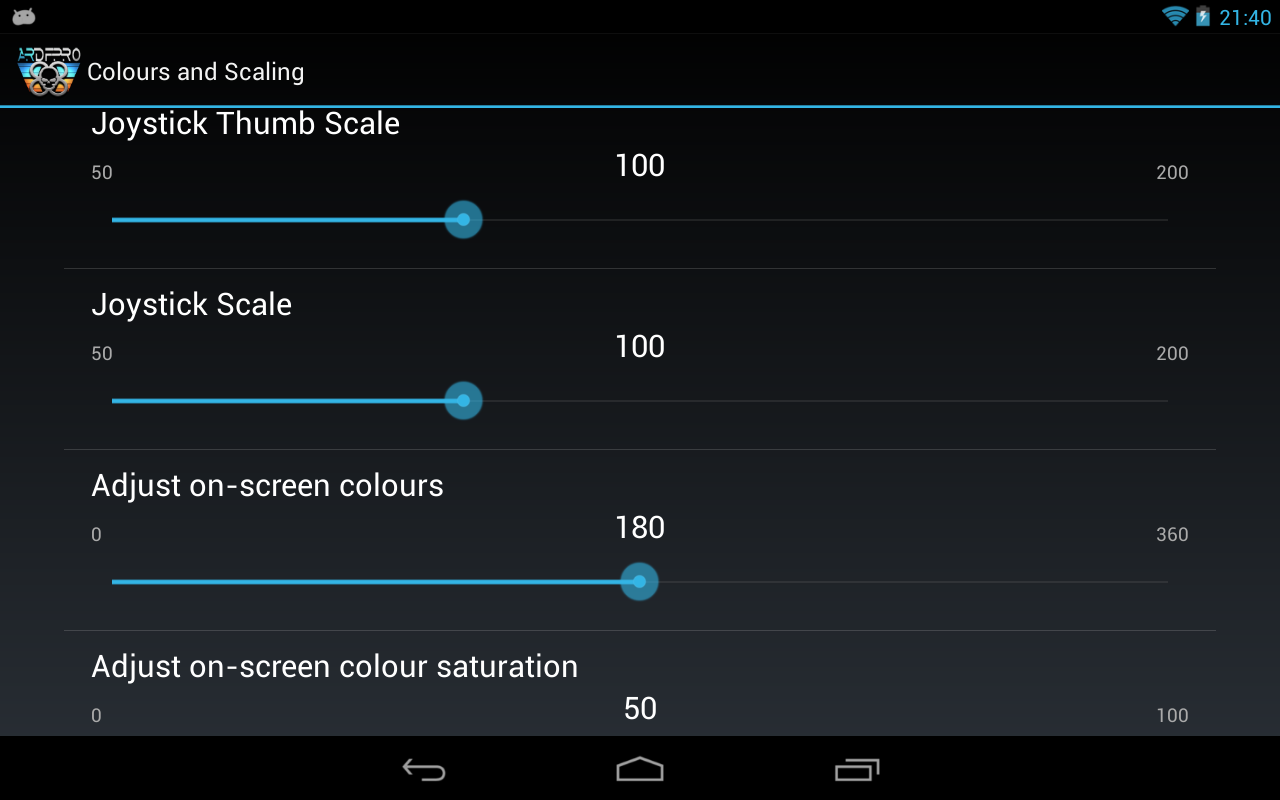
Joystick Thumb Scale
Controls the size of the on-screen joystick central thumb button.
Joystick Scale
Controls the size of the on-screen joystick background. Changing this size will mean you also need to change sensitivities and deadzones
Adjust on-screen colour
Adjusts the colour hue of the on-screen joysticks and buttons. In the Pro edition this adjusts all icon colours not just the joysticks.
Adjust on-screen colour saturation (Pro only)
Adjusts the colour saturation of the on-screen controls.
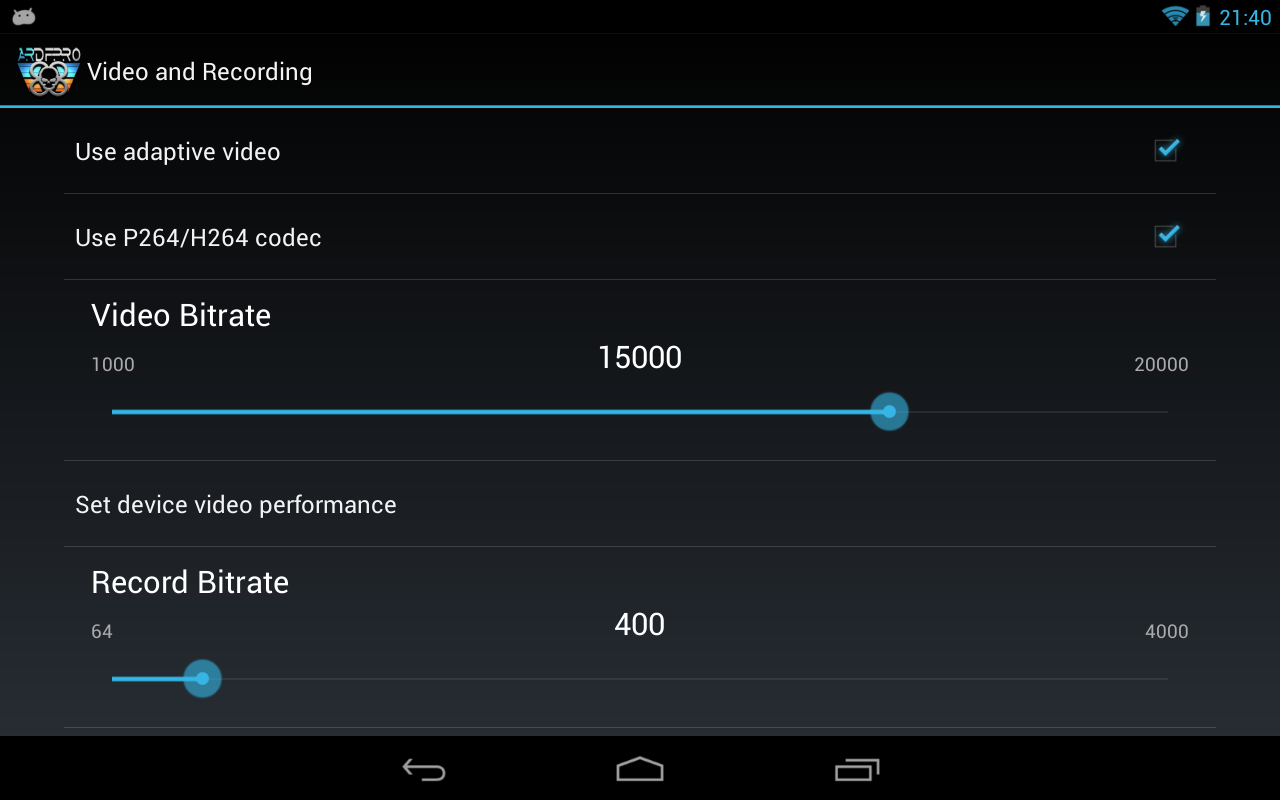
Video and Recording
Use adaptive video
When checked, the video quality adjusts depending on the frame rate being shown. So the faster the device, the better the quality.
Use P264/H264 codec
When checked, the P264 or H264 video codec is used, depending on the Drone version. When unchecked the original VLIB or soft codec is used.
Video Bitrate
This slider is only active if the 'Use adaptive video' check-box is unchecked.
It allows you to control the bitrate of the video sent from the Drone.
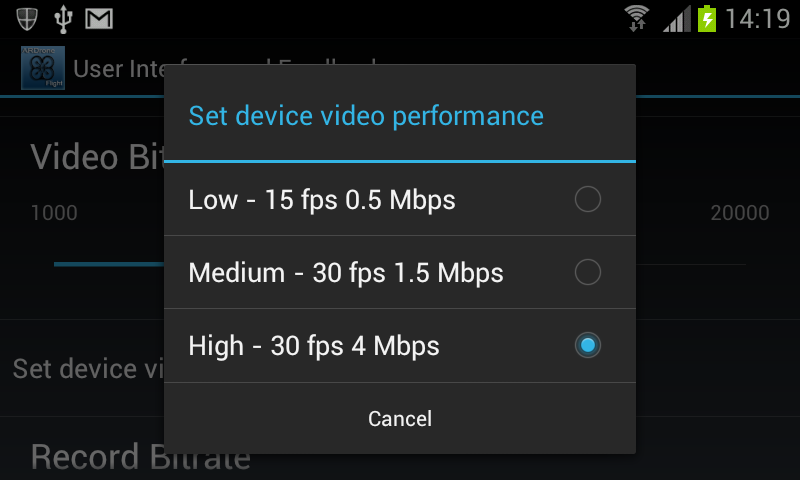
Set device video performance
Pressing this brings up a list of device performance settings, for use with V2 Drones.
It allows you to choose performance of the device you are using.
Video and Recording continued
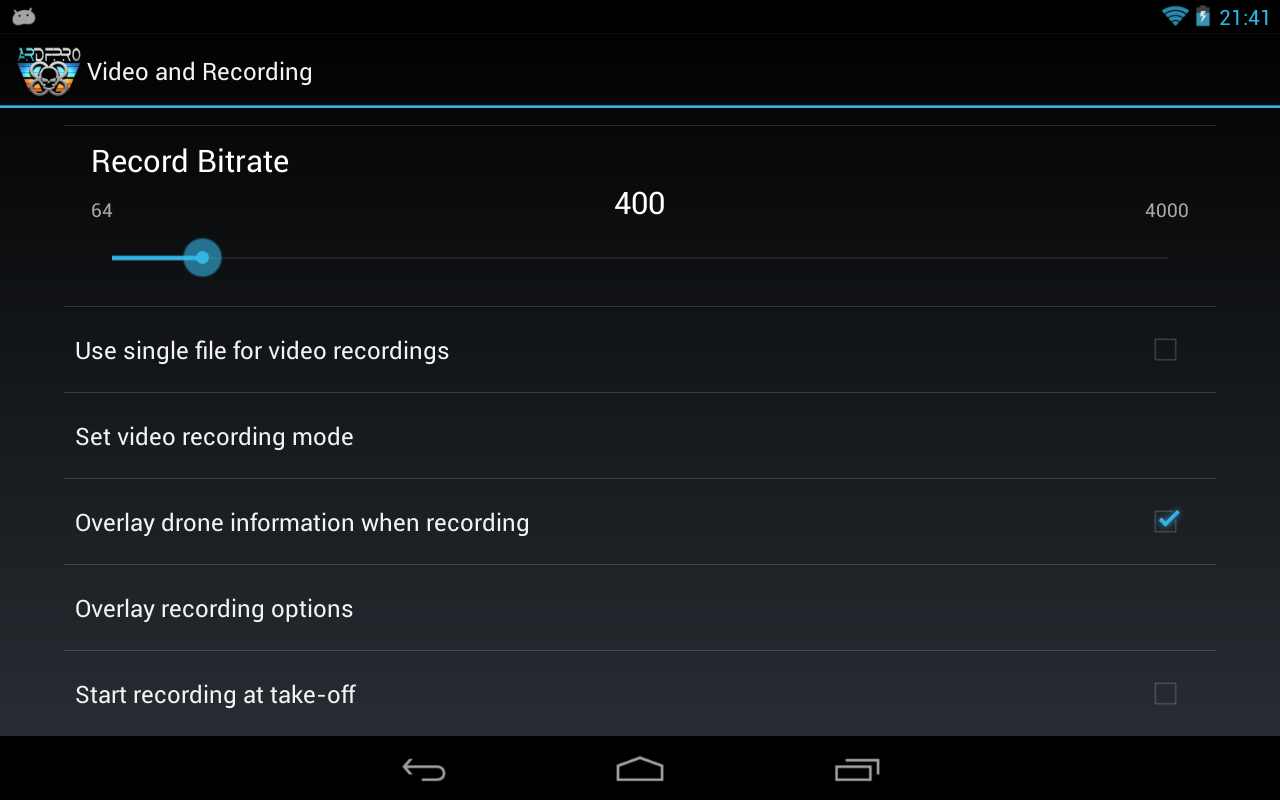
Record Bitrate
This slider controls the recorded video bitrate quality. Only for local overlay recordings.
Increasing the bitrate will give better quality video but with a larger file size.
Use single file for video recordings
Overwrites the single local recording file. Only for local overlay recordings.
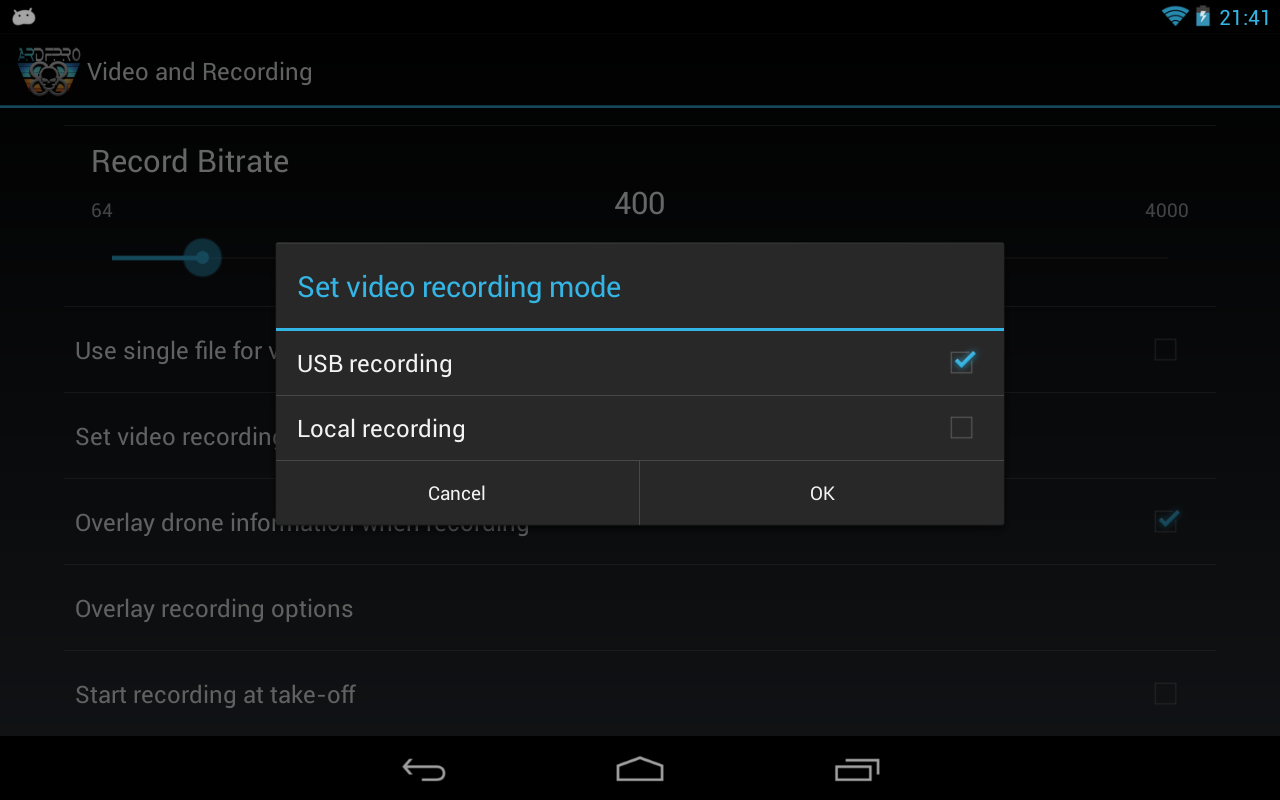
Set video recording mode
Press this to select from a list of different video recording modes
USB recording
If a USB stick is inserted in the V2 Drone then recording will take place on this.
It will fall back to local recording if no USB stick is detected.
USB time remaining will be shown as a USB: hours mins secs on-screen prompt.
Local recording
Local recording will be at 640x360 or HD 720 if overlay recording is not enabled.
Overlay drone information when recording
When checked, and local recording is active, this overlays extra drone information on the recording. Local recording will be 640x360, but will reduce the recorded FPS. When unchecked, local recording will be HD 720P, and have little impact on the recorded FPS.
Start recording at take-off
Video recording will automatically start at take-off and stop on landing.
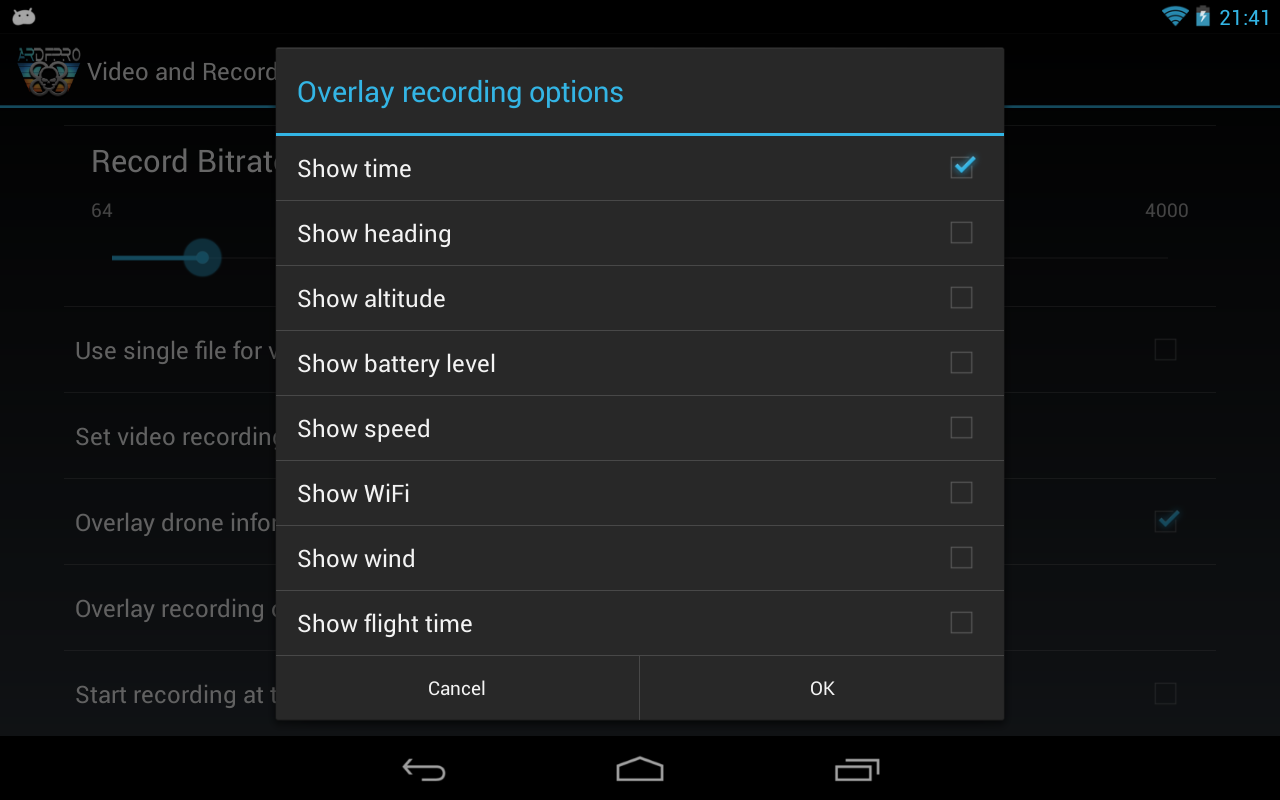
Overlay recording options
Depending on Drone version, this includes height, heading, horizontal velocities,
battery level, wifi strength and quality,
estimated drone wind speed and wind direction.
N.B. This is only done for local recordings.
UI Options
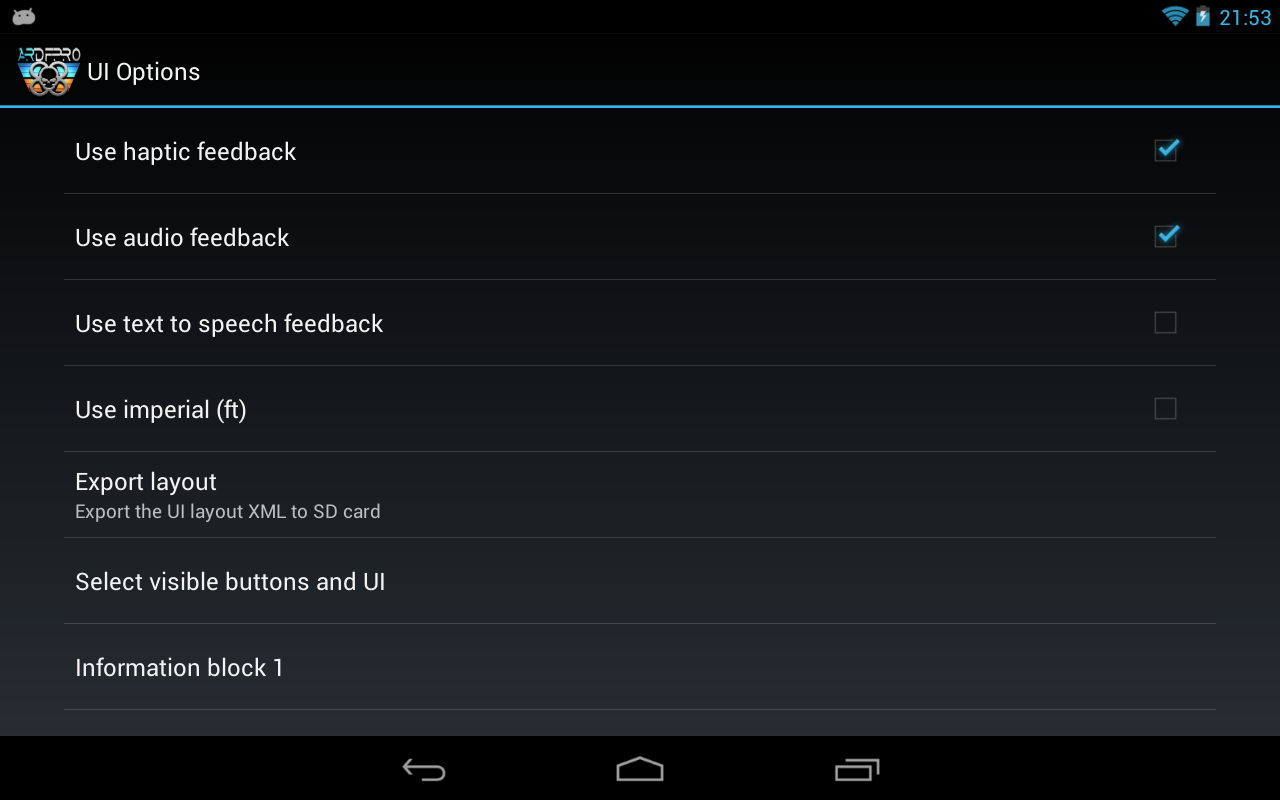
Use haptic feedback
When checked, touching the screen will give a haptic vibration, if this is enabled in system settings.
Drone error conditions will produce a morse code SOS vibration pattern.
Use audio feedback
When checked, touching the screen will give an audio click, if this is enabled in system settings.
Use text to speech feedback
When checked, touching the buttons or error conditions will be spoken.
If text to speech is not installed then you should be prompted to install, but speech will not be heard until the ARDrone app is restarted.
Use imperial (ft)
When checked, speeds will be in ft/s, distances in yards and heights in ft.
Export Layout
When pressed, the current UI layout will be exported to /sdcard/ARDroneFlight/layout/ARDroneLayout.XML.
Use this to create a custom UI layout. Errors in the sdcard XML file will mean the built-in layout will be used.
In the worst case scenario, if the UI fails to load, simply delete the sdcard file.
If the sdcard file is present, you will be prompted if you want to overwrite it when Export is pressed.
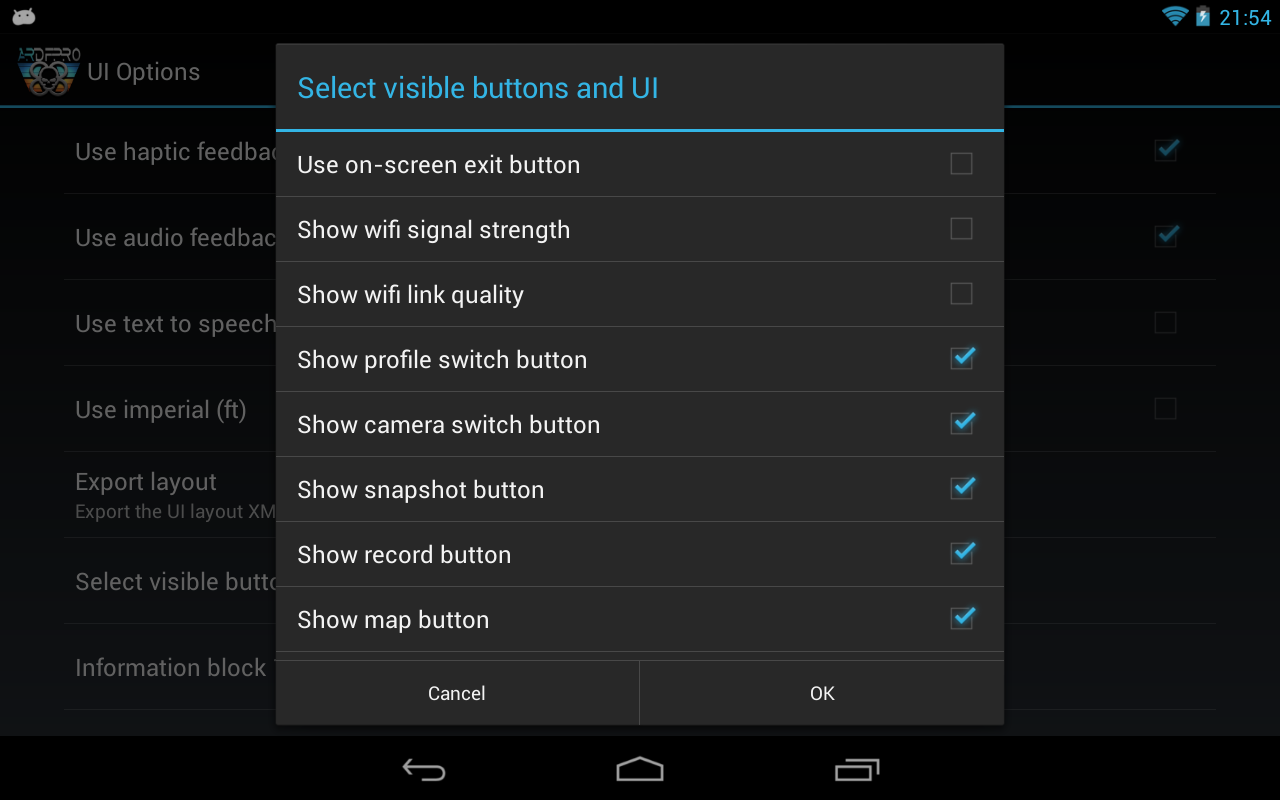
Show visible buttons and UI
When pressed, shows a list of the UI elements that can be turned on and off.
Use on-screen exit button
When checked, shows an on-screen exit button.
This disables the back button exit.
Show wifi signal strength
When checked, shows a wifi signal strength icon.
N.B. This is the same as the wifi signal meter on your Android notification bar.
Show wifi link quality
When checked, shows a wifi link quality icon.
This is a measure of errors in the wifi link reported by the Drone. Lower levels indicate interference in the wifi signal which will cause video drop-outs or control lag.
Show profile switch button
When checked, shows the profile switch button used to switch between the profiles.
Show camera switch button
When checked, shows the camera switch button used to change between the drone cameras.
Show snapshot button
When checked, shows the snapshot button used to take a drone camera snapshot saved to the /sdcard/ARDroneFlight/media folder.
Show record button
When checked, shows the record button used to record video.
Show map button
When checked, shows the map button used to show or hide the autonomous mode map. Press the map area to update the map.
Show flight animation buttons
When checked, shows the flight animation buttons used to select/play drone flight animations like V2 flips.
Show hide button
When checked, shows the hide button used to turn on/off all the UI elements except for HUD .
Always show Auto Hover
When checked, always shows the auto-hover button used turn off the drone auto-hover which makes for smoother stops when recording video. Position holding is disabled when auto-hover is off.
Show USB transfer activity
When checked, shows a progress dialog when USB videos are being transferred from a Drone USB stick to the local /sdcard/ARDroneFlight/video folder. It takes place in the background when not checked.
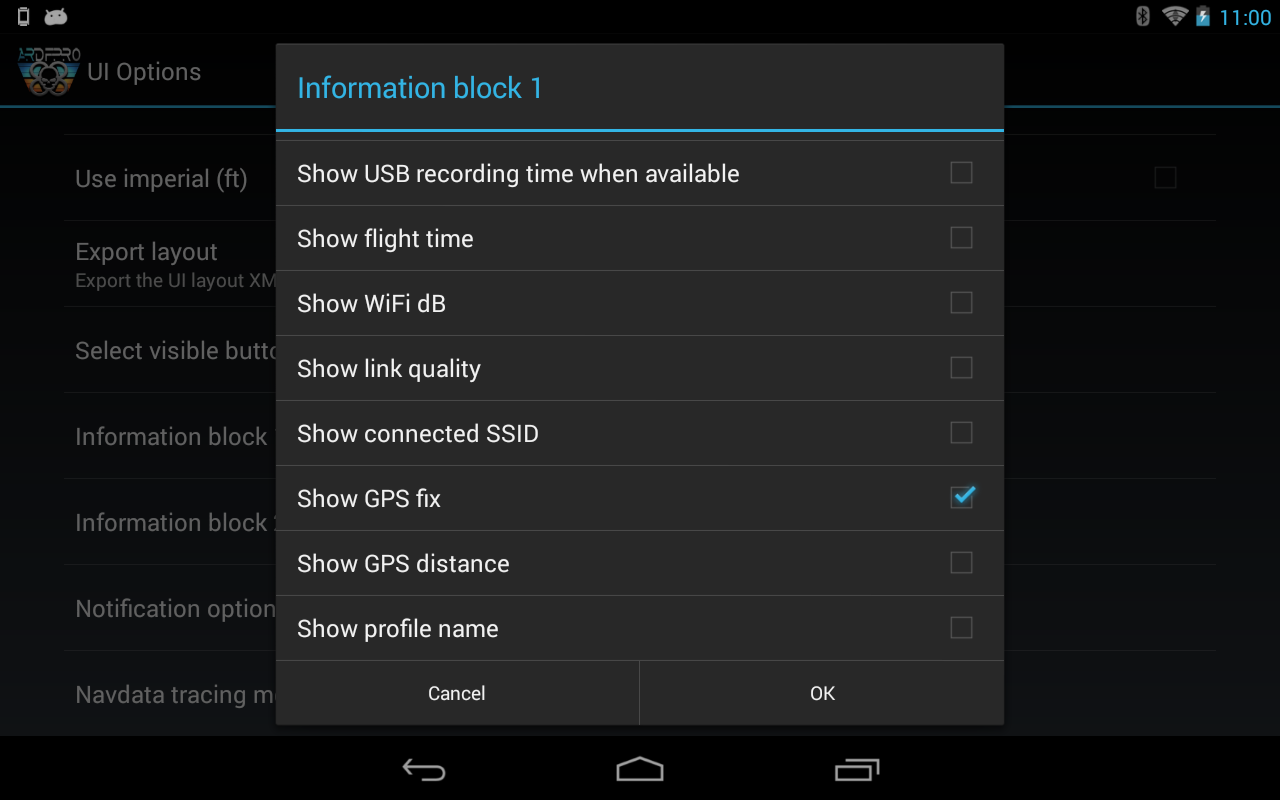
Information block 1/2
Pressing this displays a list of the text that can be displayed in the left and right information blocks.
Information block 1 is on the left. Any options which are checked for both info 1 and info 2 will only be shown in information block 1.
Show altitude
Show drone altitude.
Show heading
Show drone heading.
Show velocity
Show drone velocity.
Show FPS
Show current display frames/sec.
Show USB recording time when available
If a USB stick is detected in the drone, the available recording time will be shown.
Show flight time
When checked, shows the elapsed flying time since starting ARDrone Flight.
Re-start the app each time you change the battery and it will be the elapsed time for the battery.
Show FPS
Show current display frames/sec.
Show WiFi dB
When checked, shows the WiFi strength in dB.
Show link quality
When checked, shows the wifi link quality.
This is a measure of errors in the wifi link reported by the Drone. Lower levels indicate interference in the wifi signal which will cause video drop-outs or control lag.
Show connected SSID
When checked, shows the wifi SSID that is currently connected.
Show GPS fix
When checked, shows the GPS fix accuracy in meters / yards.
This is only shown when the Parrot Flight Recorder is installed in the drone.
Show GPS distance
When checked, shows the distance between your device GPS and the drone GPS.
This is only shown when you have been into the map display and requires both a device GPS and a Flight Recorder in the drone.
Due to the GPS errors in both devices, the distance can be significantly out from the actual distance, so should not be relied on for range calculations.
Show profile name
When checked, shows the name of the currently selected profile.
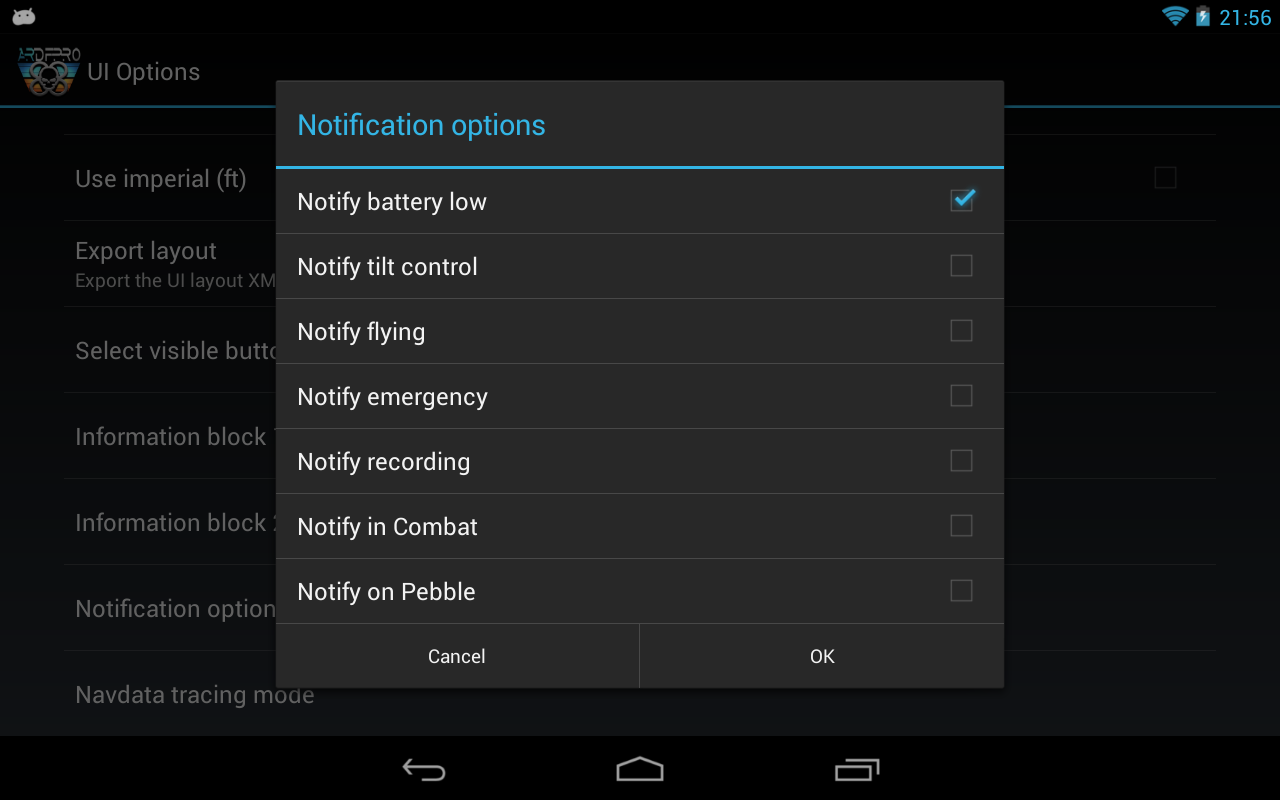
Notification options
Pressing this shows a list box with the various ways of notifying via text to speech.
When the Pebble option is selected the selected notification options will also be sent to a pebble smartwatch.
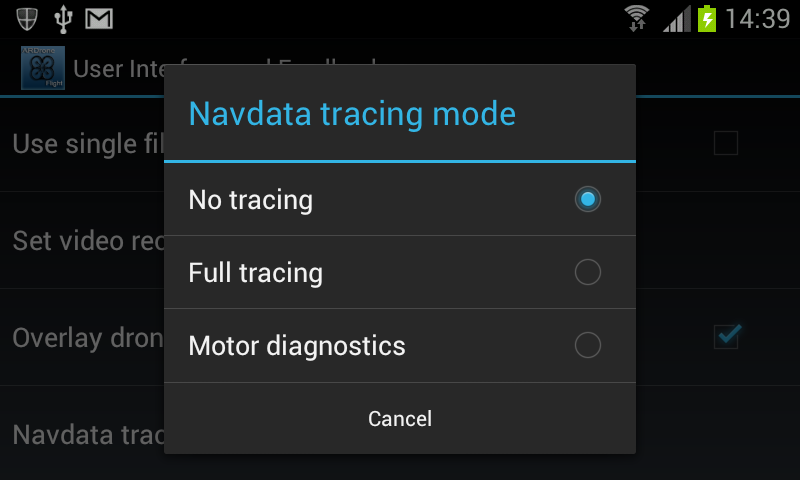
Navdata tracing mode
Pressing this shows a list box with the various ways of controlling navdata tracing.
More detailed navigation data is returned from the Drone and logged as .txt files to the /sdcard/ARDroneFlight/logs folder.
This should only be used when analysing errors in the Drone and to send information to Parrot.
No tracing
No navdata tracing is enabled.
This is the default mode and how it should normally be used.
Full tracing
In this mode, full navdata is traced to the /sdcard/ARDroneFlight/logs/mesures_"Date"_"Time".txt file.
A lot of data is returned from the Drone, producing a large file and impacting the control performance.
Only use this mode when trying to diagnose a Drone fault.
Motor diagnostics
In this mode, the Drone motor control information is returned and traced to the /sdcard/ARDroneFlight/logs/mesures_"Date"_"Time".txt file.
Only use this mode when trying to diagnose a Drone motor fault.
For my Drone, rotors were spinning up and then the take-off aborted with a Rotor Cut. Bursts of 255 values in the motor PWM column indicated a possible motor problem which was cured by replacing the affected motor.
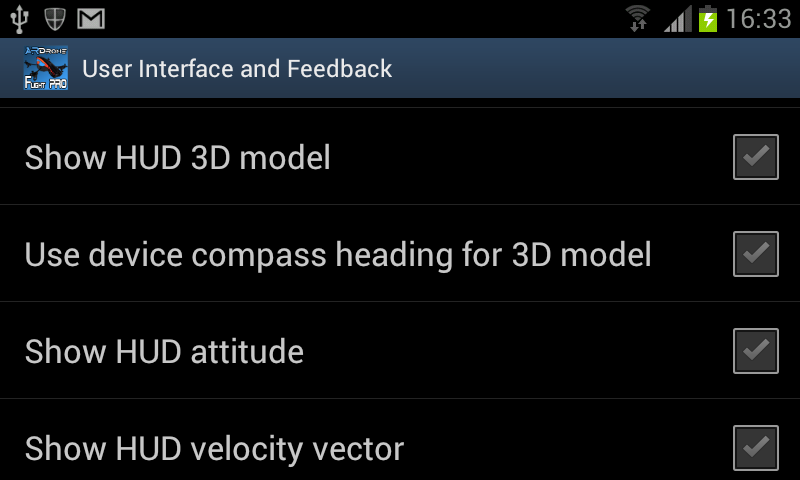
Pro HUD options
This section of settings is only present in Flight Pro:
Show HUD 3D model
When checked, shows a 3D model representing the Drone orientation and heading.
Use device compass heading for 3D model
When checked, the model heading will be relative to your device compass, so when they match the model will be facing straight up. When not checked, straight up is North.
You need to calibrate both your device compass (move in a figure of 8) and the V2 Drone by pressing Calibrate when flying.
V1 Drones do not have a magnetic compass, so North is set when the battery is connected and suffers from drift due to gyro precession .
Show HUD attitude
When checked, a HUD attitude graticule which shows the Drone pitch and yaw relative to the horizon.
Show HUD velocity vector
When checked, shows the direction of the drone flight relative to its orientation.
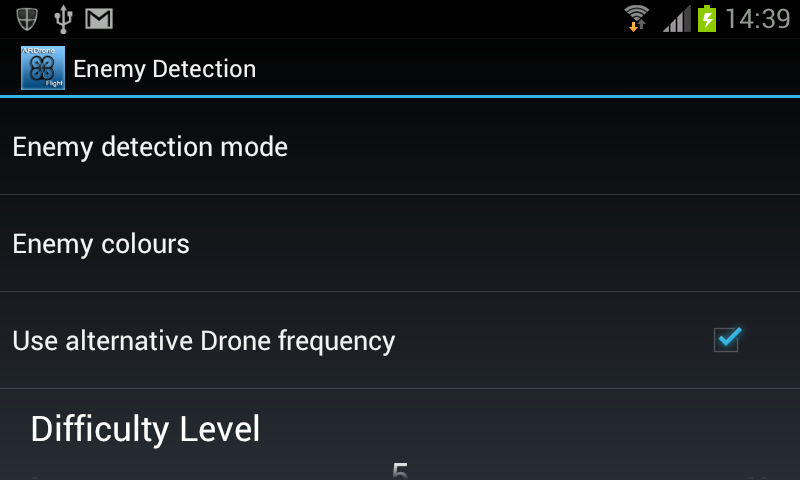
Enemy Detection
Enemy Detection is used to control the ARDrone Combatsettings.
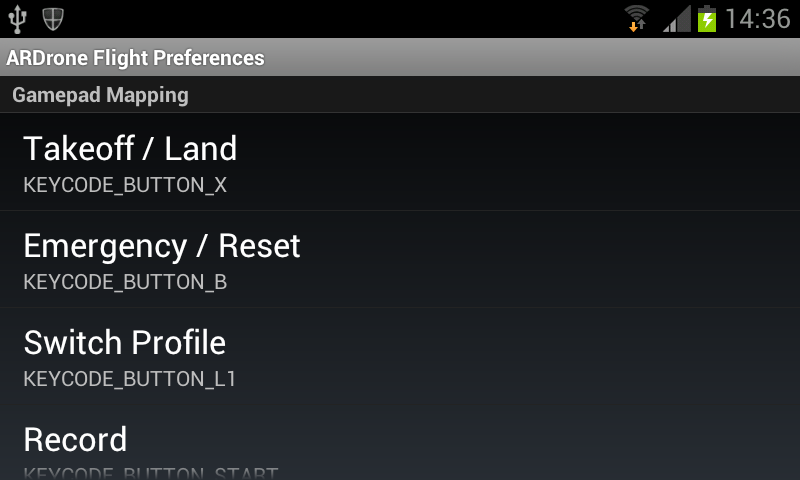
Gamepad Mapping
There is now a Gamepad mapping screen to allow the gamepad controls to be mapped for different controllers.
Touching a button section will prompt you to press a gamepad button for a Drone control.
Touching a joystick section will prompt you to move a gamepad joystick axis through its full range to select it for a Drone joystick.
If you have more than one gamepad, then use a different profile for each controller.
N.B. Gamepad mapping is only supported on Android 3.1 and newer and not all newer devices support gamepads. Check with your manufacturer for gamepad support.
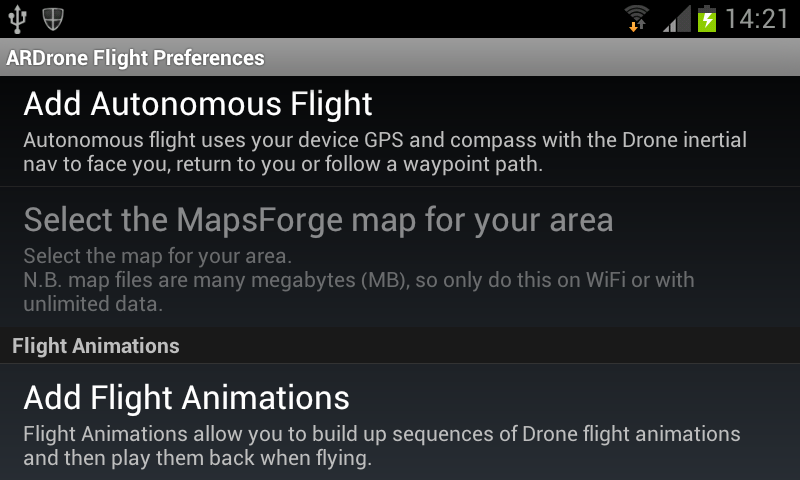
Autonomous Flight
This is an autonomous mode using the inertial navigation system (INS) of the drone combined with you device GPS. It has also support for the Parrot Flight Recorder.
When an autonomous mode is active, the Drone icon will turn red. Press anywhere on the Drone control screen to turn off autonomous mode, or choose the Disabled option and the Drone icon will turn black.
Autonomous control will automatically turn off within 5m of your location, due to the errors in GPS and INS.
N.B. Without the Parrot Flight Recorder this only uses INS, which isn't very accurate and you must remember to calibrate your Drone, using your device GPS and compass before take off, to set its compass correction and location. Use it for fun in an open area, but do not rely on it due to INS errors.
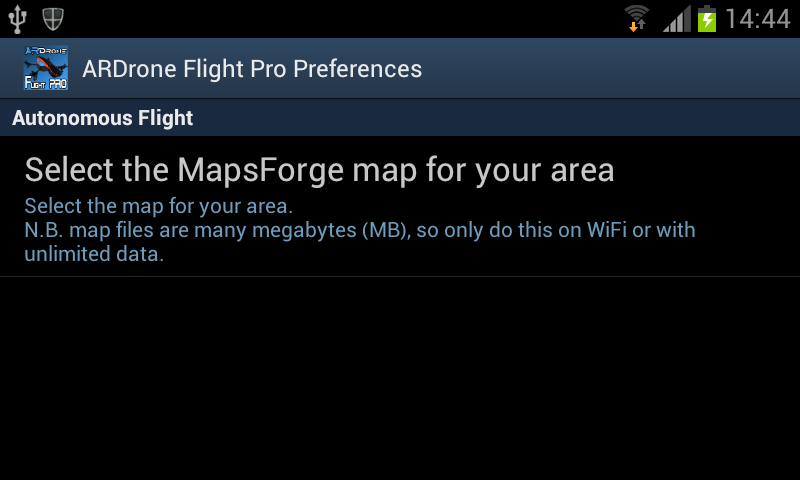
It uses the offline mapping provided by Mapsforge.
For ARDrone Flight Pro, Autonomous Mode is included and the map can be added via the Licensing and Mapping setting.
For ARDrone Flight, Autonomous Mode is a Platinum Feature, enabled via in-app billing from the Platinum Features menu "Add Autonomous Flight".
You will be prompted to connect to the internet before seeing the Platinum Features screen.
Once you have brought the Autonomous Flight feature, the select option will be enabled and you can download a map.
You will also see the GPS symbol on the main screen and the "Show Drone Location" menu option which gets you into Autonomous Flight mode.
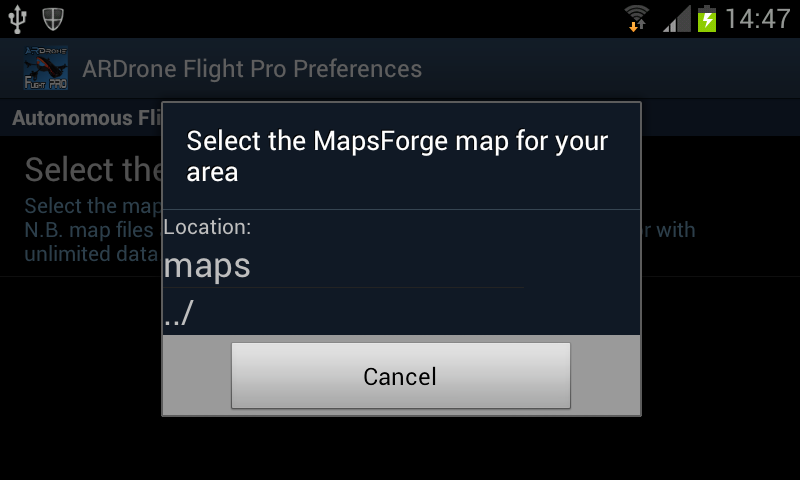
Select the MapsForge map for your area
You need to download a single map for your region using the built-in MapsForge map picker from the selection option.
Choose a single map for your region and it will show you a dialog with the selected map and its size.
N.B. The maps are a big download, so only use mobile data if you have an unlimited contract.
The map will automatically be downloaded and renamed to /sdcard/ARDroneFlight/map/ARDrone.map. Without a map, you will not be able to use the autonomous feature.
Autonomous Flight only uses a single map for your region, so download a single map for the area where you are going to fly the Drone.
If the MapsForge site doesn't have a map for your region, then you can also create your own maps following the Mapsforge map creation instructions.
When this is checked, the map is rotated to your device compass heading.
Show Track (or Trk)
When this is checked, the track of your Drone flight will be displayed as the Drone moves. It is not recorded to a file.
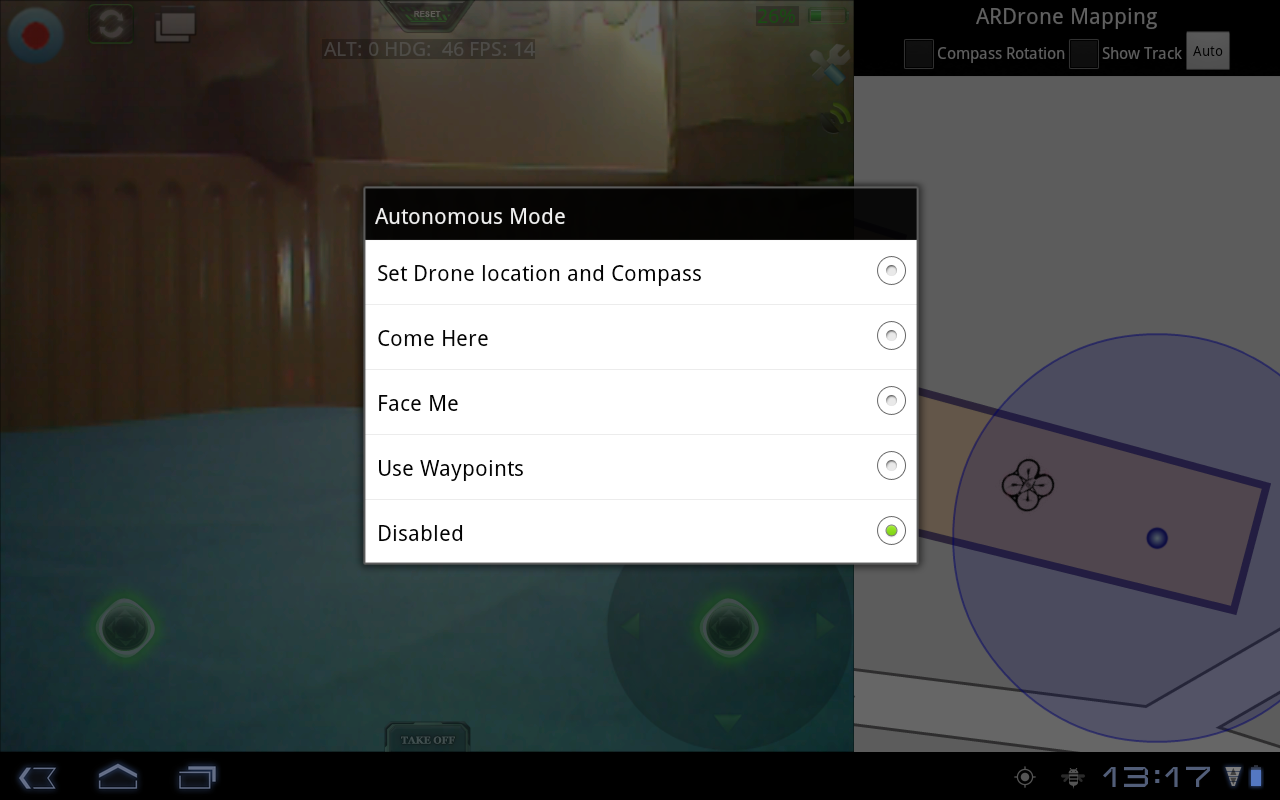
Auto button
Pressing the 'Auto' button brings up the Autonomous Mode selection dialog.
Set Drone location and Compass
The INS suffers from precession, and has to be reset to your device compass and your location before every take-off when you plan to try autonomous control. Selecting this mode brings up the calibration dialog.
The Autonomous Mode dialog:
Come Here
Pressing this turns on the Come Here autonomous mode where the Drone flies to your current location.
Face Me
Pressing this should get the Drone to face you, so it should be used to check that the GPS and compass calibration worked.
Use Waypoints
Touching on the map allows you to add waypoints to build up a flight path for the Drone to follow. Touch a waypoint to remove it from the list.
Pressing 'Use Waypoints' will get the Drone to fly to the first waypoint and then move to each waypoint in turn.
N.B. Do not use waypoints over a large area, as the Drone is only able to fly 50m from your device, due to the wifi limited range.
Disabled
Press this to turn off the autonomous control of the Drone.
Track / Track and hold distance
These two options are experimental and are used in conjunction with Enemy Detection built into the drone firmware.
Select the colour and type you want to track in the Enemy Detection settings.
Hover the drone and make sure you see the tracking box following the target. Then choose 'Track' or 'Track and hold distance'.
Track just keeps the drone camera locked on the target adjusting heading and height.
Track and hold distance will attempt to keep the drone at a constant range from the target. This uses the built in drone firmware detection range estimate which is not accurate as the drone only has a single camera, so should be used with care.
Flight Animations is a Platinum Feature, enabled via in-app billing from the Platinum Features menu "Add Flight Animations".
You will be prompted to connect to the internet before seeing the Platinum Features screen.
Once you have brought the Flight Animations feature, the Flight Animations menu will be enabled and the new on-screen controls will appear.
Flight Animations allow to to build up multiple list of flight animations and play them back when the Drone is flying.
This includes the new V2 Drone Flips.
N.B. It is your responsibility to ensure your are flying your Drone in a big enough area and high enough to carry out the animation sequence.
It uses two new on-screen controls on the bottom left of the screen.
The Play button (bottom left corner) allows you to start the current selected Flight Animation sequence. It changes to a Stop button while the animation is active.
To the right is the Next Animation button. This moves through your list of Flight Animations, showing the current selection via an on-screen prompt.
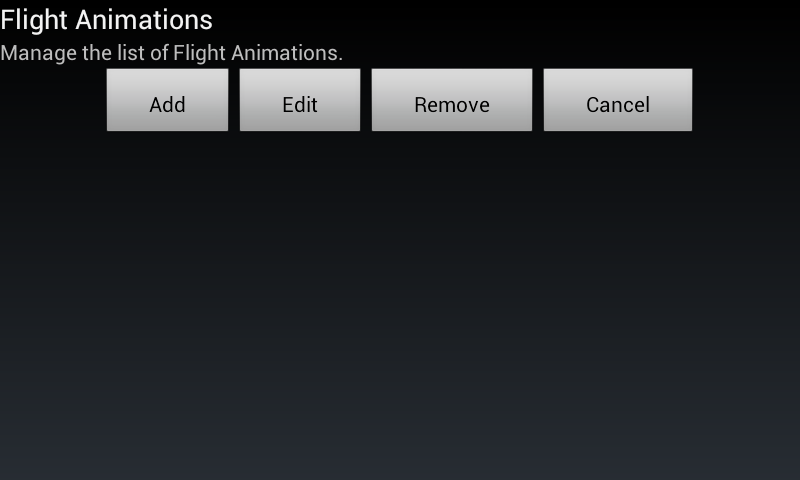
Flight Animations Menu
You manage your Flight Animations from the Flight Animations menu.
This takes you to your list of Flight Animation sequences which can be added, edited and removed.
Pressing Edit or Add takes you to the Edit screen for a given Flight Animation sequence.
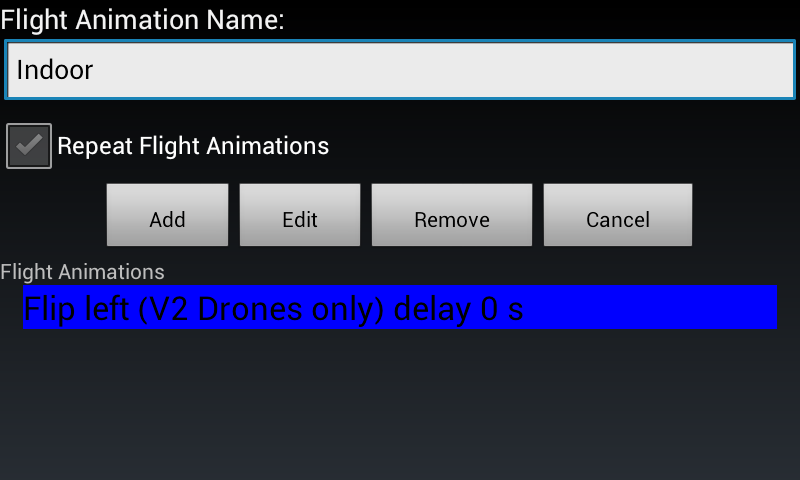
Flight Animation Sequence Edit
You can name your sequence and choose if you want the sequence to run once, or keep repeating until you hit the Stop button.
The rest of the screen shows the list of Flight Animations that make up your sequence.
Select an individual animation and press Edit to edit it; Add to add and new one; Remove to remove the animation.
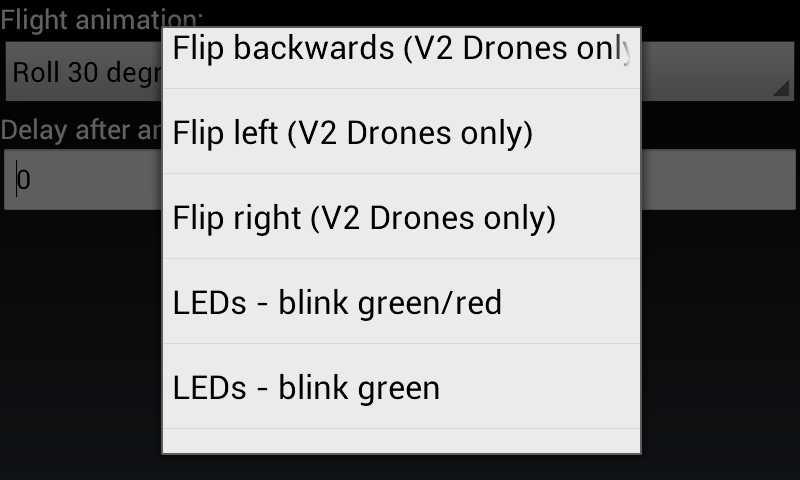
Flight Animation Edit
The Flight Animation edit screen allows you to change the animation or the delay (in seconds) after the individual animation.
Selecting the drop down list of animations will show the full list of animations available.
Flight Animation List
The Flight Animation list shows the full list of animations for both V1 and V2 Drones.
Please note that the animations marked with (V2 only) will only work with V2 Drones.
In the Autonomous mode it adds drone GPS support, so it is no longer necessary to set the drone location.
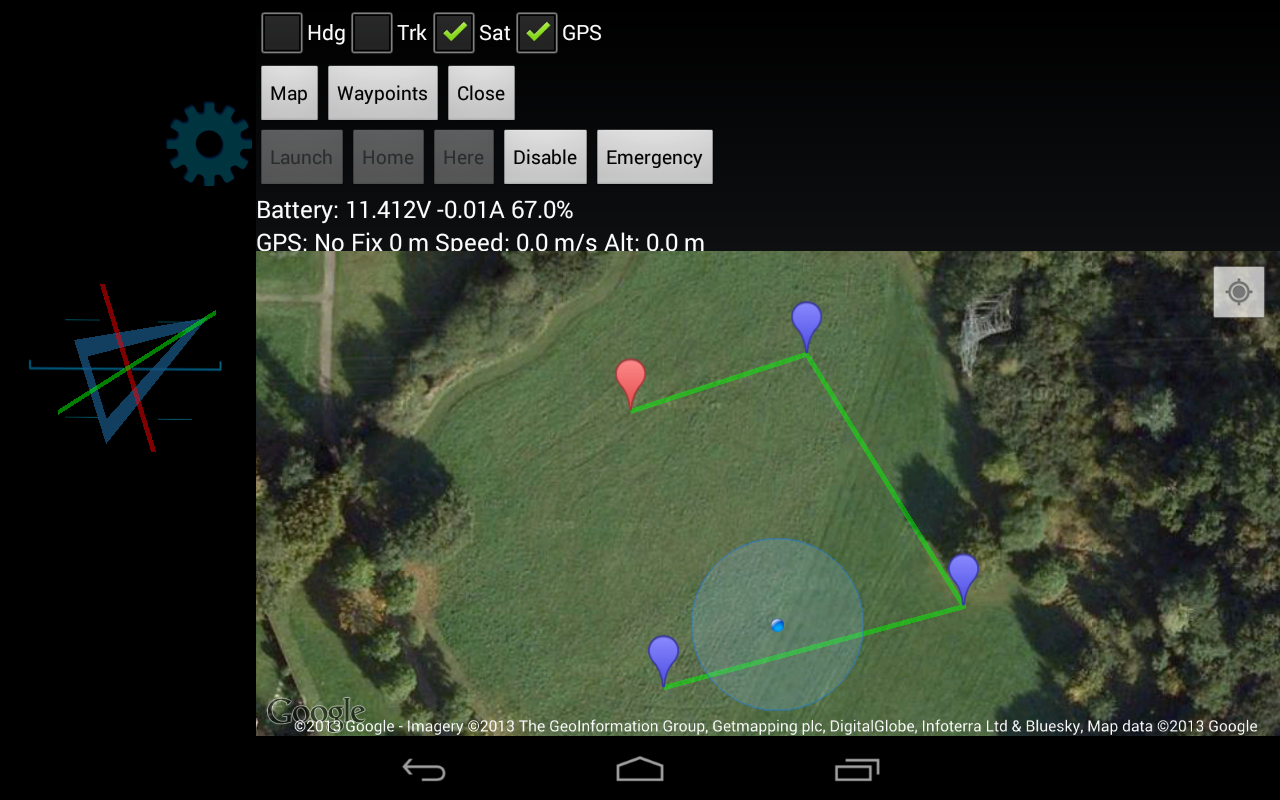
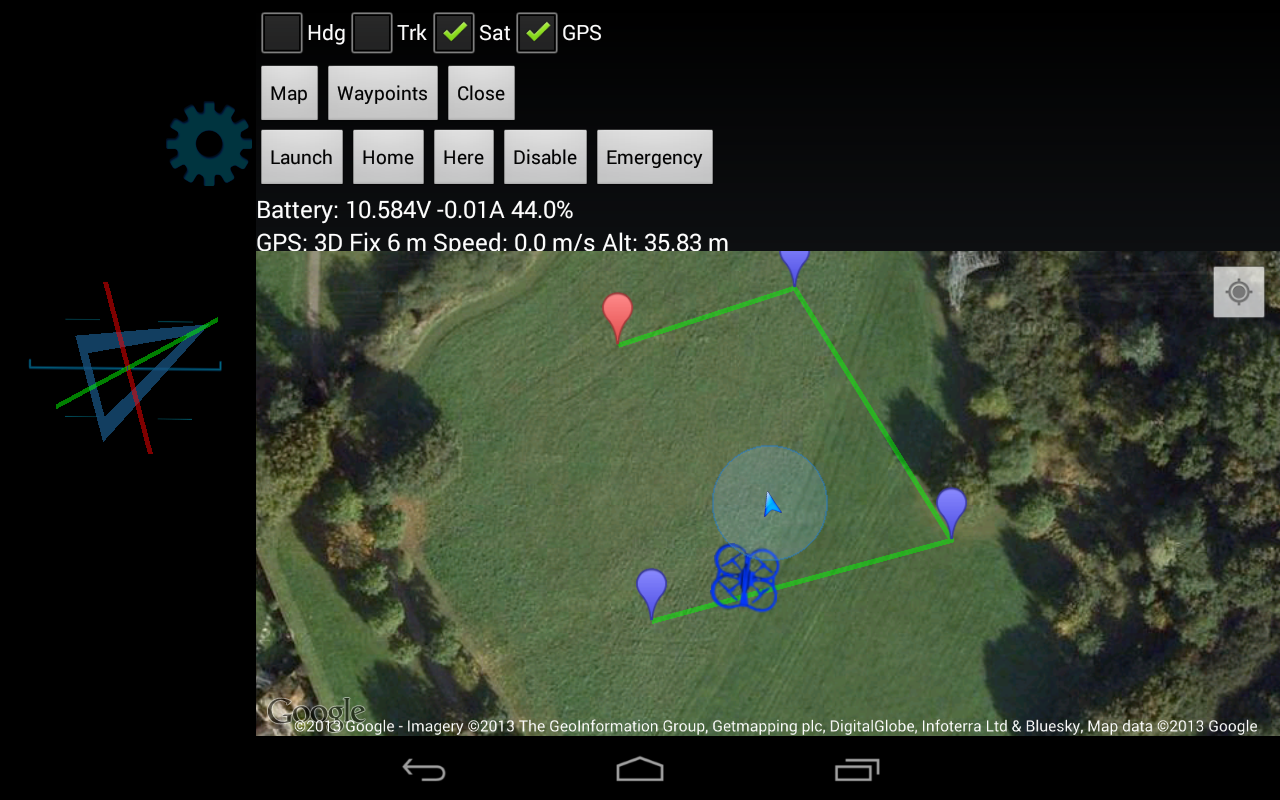
Planner mode is a new full screen map mode, selected from the Plan button, which allows control of the drone using the MAVLink protocol as used by QGroundControl.
N.B. Flight Recorder support was only added in Parrot firmware 2.4.1, which suffers from fly-away issues. Currently 2.4.7 is the firmware Parrot recommend.
Your device must also have a GPS and you need to download a map for your area before it can be used.
Due to current issues with Parrot firmware sensor fusion, when the Flight Recorder is installed you need a better than 15m 3D fix with the GPS fix LED flashing before you can take-off.
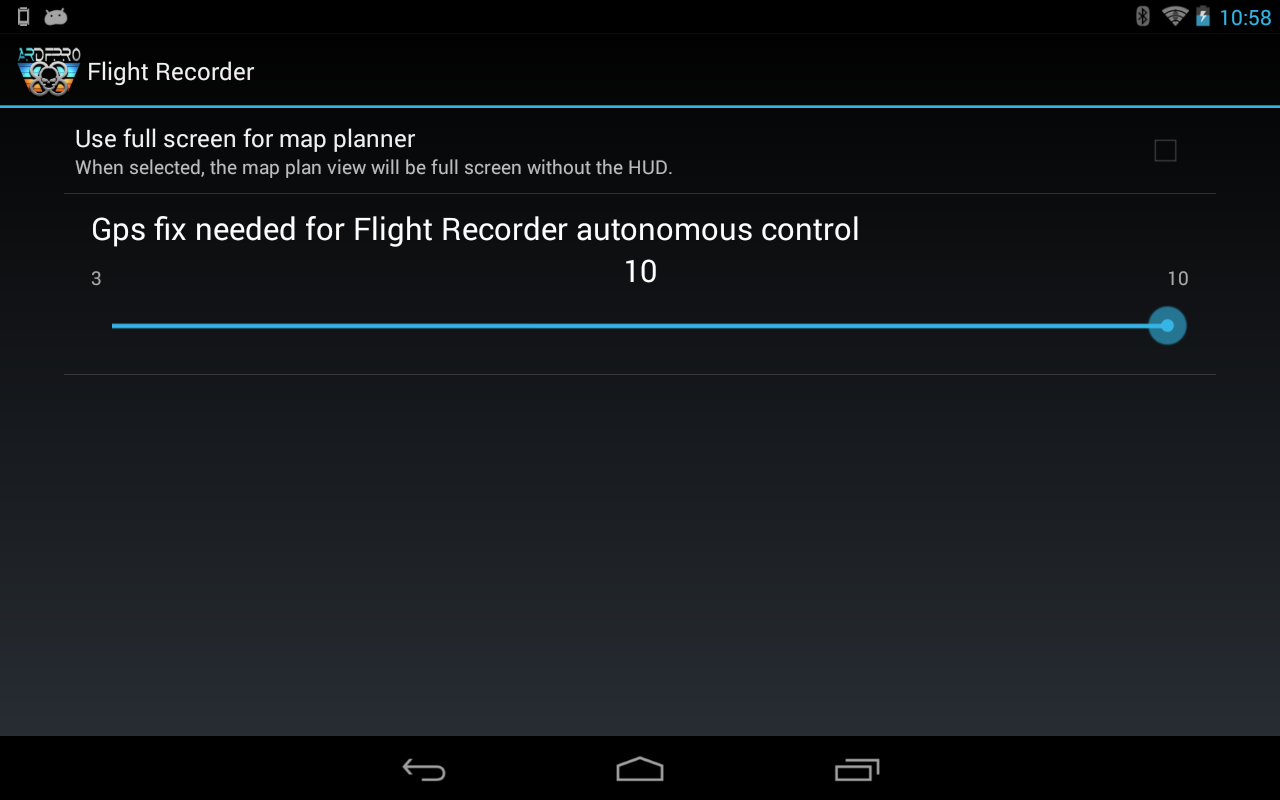
Flight Recorder Settings
The Flight Recorder settings entry allows configuration of the interaction with the flight recorder.
Use full screen for map planner
The planner mode defaults to showing the settings button and HUD on the left, but for small screen devices you can choose to use the full screen for more map area.
GPS fix needed for Flight Recorder autonomous control
This slider controls the GPS fix accuracy that is needed before the MAVLink Waypoint following, Launch, Home and Here buttons are enabled.
The better the 3D GPS fix, the more stable the flight will be. It defaults to 6m.
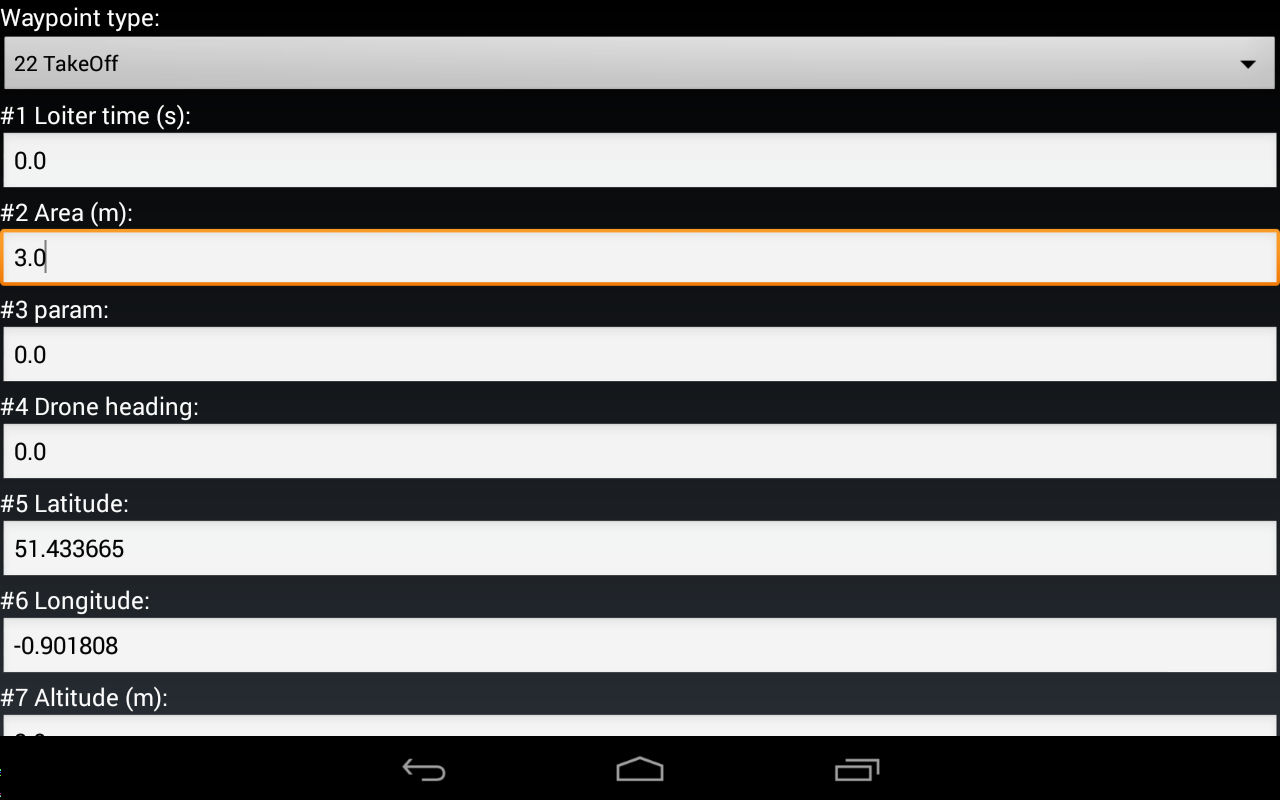
Waypoint Editing
Pressing on a map waypoint now brings up a new edit dialog to allow you to edit the waypoint settings.
N.B. The new settings and height are only used by MAVLink Follow Waypoints mode. The Map Autonomous mode just uses the location.
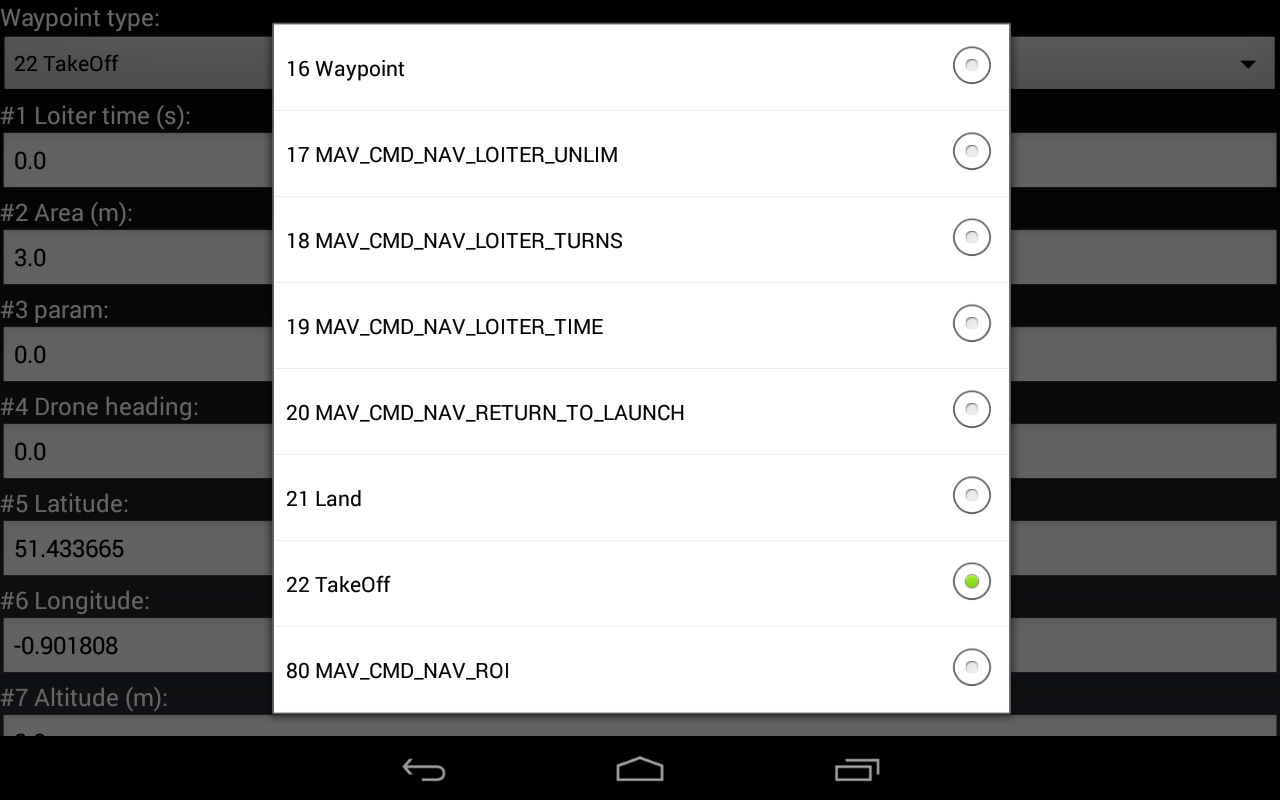
The Waypoint type drop down shows a list of the available MAV_CMDs.
Current Parrot firmware has a limitation that only Global MSL altitude can be used if you want the drone to fly at different heights above ground, when they should be using Global relative altitude.
Waypoints
Pressing the 'Waypoints' button takes you to the waypoint selection dialog which allows different waypoint files to be created and switched between.
Waypoint files are compatible with the QGroundControl file format.
Follow Waypoints
Pressing 'Follow Waypoints' uses the new MAVLink autonomous control to follow the active waypoints list.
The button will only be enabled if a sufficiently accurate GPS fix is available.
When the drone is under MAVLink waypoint following mode you cannot use manual controls and only the 'Disable' or 'Emergency' buttons will stop it.
New File
Pressing 'New File' creates a new waypoint file. The .txt extension is added automatically and it is created in /sdcard/ARDroneFlight/map.
Remove All
Pressing 'Remove All' prompts you to confirm that you want to clear all the waypoints from the currently selected waypoint file.
MAVLink Control
In addition to 'Follow Waypoints', Planner mode has new MAVLink control buttons Launch, Home, Here, Disable and Emergency.
Follow Waypoints, Launch, Home and Here are only enabled with a good enough 3D GPS fix is available.
The Sat checkbox can only be used if you have connected to the internet in your area recently, as Google don't allow apps to cache this information.
The GPS checkbox allows the GPS and battery text to removed on a smaller screen. It defaults to be checked.
The Trk checkbox shows a track of the drone positions. It is not persisted and clears automatically when getting too large for Google maps.
When a better than 6m fix is available, the drone icon turns blue to indicate the best fix for MAVLink control.
N.B. There are no manual controls via gamepad available when MAVLink control is active. Exit planner mode by pressing Map or Close to regain manual control.
Launch / Land
Pressing 'Launch' instructs the drone to take off and hover at the current position. The text changes to Land to land again.
If the button is greyed out and the Drone still flying, then use Emergency to land the drone.
Home
Pressing 'Home' returns the drone to the current home position as determined by Parrot. This can either be the last launch position, first waypoint or current position, as Parrot are unclear what it does.
Here
Pressing 'Here' will fly the drone to your current GPS position.
Disable
Pressing 'Disable' tells the drone to stop its current activity and hold its current position.
Emergency
Pressing 'Emergency' tells the drone to stop its current activity and land at its current position.
N.B. This is via a controlled landing, not a rotor cut. It should also be used to reset the Launch state if the drone crashes.
Due to the time, effort, expenses supporting this app combined with the lack of voluntary donations, support for V2 Drones now requires a Donation via the Platinum Features, or for you to own ARDrone Combat.
a) Go to the Change Settings menu and select Platinum Features.
b) You will be taken to the wifi settings screen, so choose your internet connected wifi access point, or turn off wifi if you plan to use a 3G connection. You have to connect to the internet, as the billing and verification is handled by Google servers.
c) Press the Back button to take you back to the Platinum Features menu.
d) Successful purchases are cached and only take place once, with the Donate menu greyed out to show you have Donated. If it isn't greyed out, then you haven't donated and will only be able to fly a V2 Drone if you own ARDrone Combat.
e) Once you have finished purchasing Platinum Features, press the Back button.
f) You will be taken back to the wifi settings, so connect to the Drone wifi.
g) Once connected, press Back again and you will be at the top level Preference Settings screen. Back again will take you back to the Drone control screen.
Re-installing the app or moving to a new device is handled by Google and will be restored for the Google account the purchase was made from.
The key thing is to always follow the on-screen prompt and connect to the internet when it tells you to. Failure to do so means the donation will not have been verified with Google, so you will not be able to take-off.
You will need to periodically connect ARDrone Combat to the internet to validate the Market license and will get a warning dialog if it isn't licensed.
a) Connect to the internet.
b) Turn on Bluetooth.
c) Start Combat and verify settings.
d) Now the Combat license has been verified, you can connect to the Drone wifi.
You have to repeat these steps to re-verify the Combat license.
N.B. If you don't want to use Combat then you can turn-off Bluetooth before starting ARDrone Flight
Pro includes all the Flight Platinum Features: V2 support, Flight Animations and Autonomous.
Pro also has new icons; HUD display and 3D model; the ability to control icon colours and saturation; the ability to hide all on-screen icons; the no auto-hover gamepad mapping option.